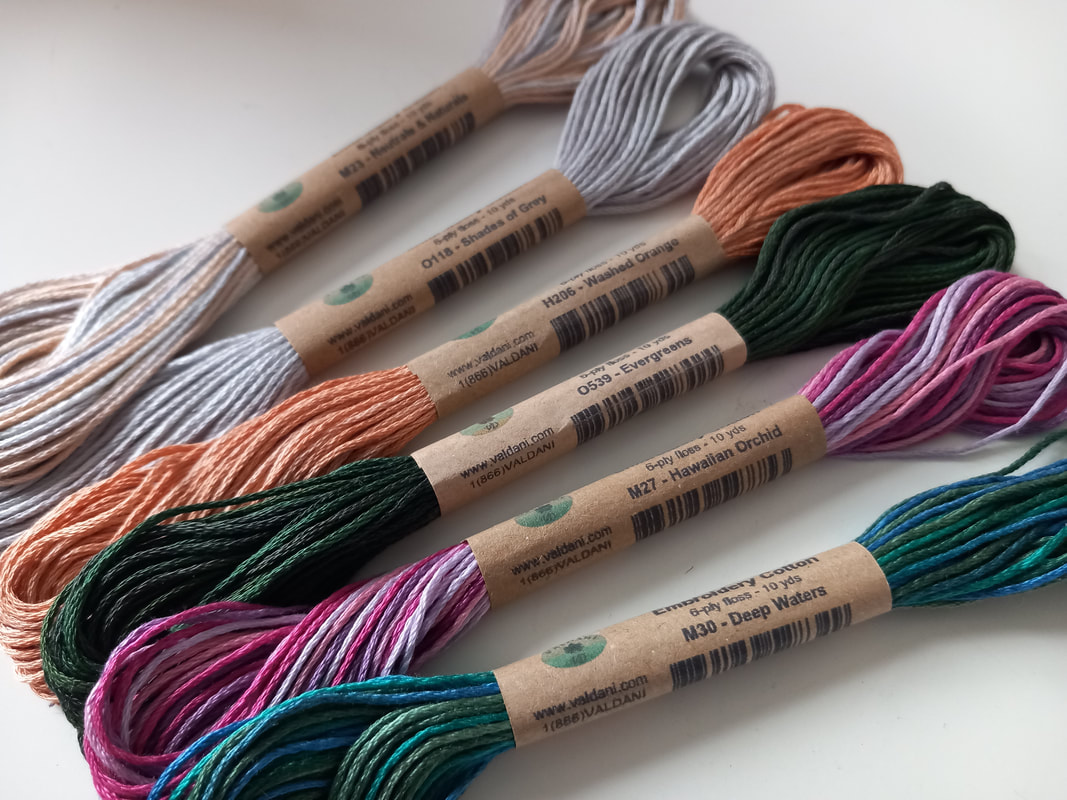
A few weeks ago I purchased issue 119 of Today's Quilter magazine, specifically to get this super pattern which was featured in a supplement. The pattern Festive Robin Wreath is designed by Jo Avery and features a variety of my favourite techniques - wool applique, needleturn applique, hand embroidery and buttons for embellishment. This robin looks very jolly, although I was only able to enlarge the prnted templates to 160% so the robin and wreath are a bit smaller than Jo's original pattern. I used a piece of Essex linen for the front of the cushion, and once the applique and hand embroidery were completed, I machine quilted very simply around both the outer and inner wreath... ...the applique pieces are layered, with the wool felt holly leaves being stitched first. I've used green felt for the holly and the ivy, and fabric scraps for the leaves that are needleturned appliqued. I had a good rummage in my button tin for some small red and white buttons for the mistletoe and holly berries. I embroidered my name and the year on the back of the cushion above the zipper opening. The back of the cushion is made with the same Essex linen that I used for the front. Once the front and the back of the cushion were stitched together, a red striped double-fold binding was added to neaten the raw edges... ...and here's my completed cushion, ready to display over the festive season. I've filled the cushion cover with a plump feather pillow form, and it will have pride of place in my lounge!
0 Comments
A couple of weeeks ago I attended a wreath-making workshop with my youngest daughter. The workshop had been organised to raise funds for a local primary school, and there were lots of ladies pf all ages participating. We both had such a super time, it was lovely spending a creative afternoon together, Here's my completed wreath, embellished with pine cones and cinnamon sticks, rusty stars and red painted jingle bells. I'm really pleased with this one, and it looks super on my bright red front door!
Started back in September on a quilting retreat, this quilt was probably the most ambitious one I've ever made. Designed by Carrie Nelson of Miss Rosie's Quilt Co, it uses 36 different fabrics from the Rosewood collection by 3 Sisters for Moda, and using 28 assorted blocks for the quilt top, along with 31 differnt blocks using a combination of those fabrics AND a tricky pieced border as the blocks are on point, it certainly was a challenge! It was then expertly longarm quilted by Daisy May Quilting, and I've just finished stitching the binding onto the back. I really an so pleased with it! I think this is the most beautiful quilt that I've ever made, and even Mr F likes it too, which is certainly a compliment!
Another festive project designed by Anni Downs of Hatched and Patched, this one is the Around For Christmas Tree Skirt - purchased as a kit from Poppy Patch back in the summer, this kit uses fabrics from the Down Tinsel Lane collection, also designed by Hatched and Patched. The tree skirt is made up of 16 segments, each with a hand embroidered and appliqued deign, which is then appliqued in place once the tree skirt has been constructed. This has been machine quilted very simply, along the seam lines of the segments, and around the appliqued circles... ...the pattern suggests the circular tree skirt can be fastened with ribbon ties - however I've made fabric ties from some of the fabric that was used for the segments. As a final flourish, I've added a small hand embroidered label to the back, and I managed to keep the label within the circular quilting on one of the segments... ...and here's the finished tree skirt. This can now be wrapped up ready to be gifted to some very special children - hopefully their mummy will love it as much as I loved making it!
I've delved into my box of kits again, and here's one that I purchased back in 2021 from Coast and Country Crafts and Quilts - the All For Christmas Advent Calendar by Anni Downs of Hatched and Patched and this was a fabulous jit - it contained all of the fabrics (these are from the All For Christmas colletion, also designed by Anni) and also included the DMC embridery threads required, along with a pack of press stud fasteners for the cute little gift bags. The pattern instructions suggested using needleturn applique for the small blocks, but you could use whatever method of applique you prefer. The blocks are also embellished with hand embroidery, using very simple stitches. I used a lightweight fusible interfacing on the back of the blocks, which I fused in place after I'd traced the design onto the fabric... ...once all the small blocks are stitched, they're joined together, pressed, and finally the bordered are added. Rather than quilting and adding a binding, this calendar is layered together with the wadding on the bottom, then the backing fabric facing the right way up and the pieced calander facing right side down. It's then stitched all the way around the outer edge, leaving a gap for turning through, which is then hand stitched closed and finally quilted... ...next step was to make 25 little gift bags - each one is embroidered with a number, and has a perle thread drawstring to keep it closed. A press stud fastening is stitched on the back of each bag, along with the corresponding part stitched onto the outer blocks of the calendar... ...the gift bags are then attached to the calendar, and can be arranged around the blocks however you wish. You can see from these pictures, I'd machine quilted this very simply with a cream quilting thread... ...I've added a quilt sleeve on the back of the calendar so it can be displayed on the wall, and I've added a very simple label on the back, made from a leftover piece of fabric. I've used one of the fabrics from the same collection for the backing, although this wasn't included in the kit... ...and here's the completed advent calendar - ready to be filled with little gifts and surprises for my grandsons. I'm sure they'll love dipping their fingers inside these bags to find their treats. This really has been a super project to make, and I'm sure it will get used every Christmas for many years to come!
This morning I collected my Kate quilt from the longarm quilter Daisy May Quilting - and I couldn't be more pleased with it! This is the quilt that I started back in September when I was on a quilting retreat with friends, and after hours of organising fabrics, lots of cutting, hours and hours of precision piecing, this was finally put togather almost 6 weeks later. This was purcjased as a pre-packaged kit, and was designed by Carrie Nelson of Miss Rosie Quilt Co, and made using fabrics from the Rosewood collection by 3 Sisters for Moda. I'd originally purchased the kit from my local quilt shop, Kis Quilting Ltd back in 2019. Now I just need to get the binding prepared and then I'll be spending the next few evenings stitching the binding in place.
Back in the summer, I purchased this pretty kit from Poppy Patch - designed by Anni Downs of Hatched and Patched, this pattern is the Christmas Gatherings Folder Cover. The kit included all the fabrics needed to make the folder cover, and they are from the Down Tinsel Lane fabric collection, also designed by Anni Downs. The stunning centrepiece is hand embroidered and appliqued - the pattern instructions suggest needleturn applique, but you could use whatever method you prefer... ...as with all of the Hatched and Patched designs, it's all about the details - although I added a tiny star button to the tops of the Christmas trees rather than hand embroidered ones. The pattern instructions listed colours of DMC embroidery thread to use, which I supplied myself, and these matched the colours of the fabrics perfectly... ...once the centrpiec is completed, it was pressed and then appliqued to the front of the folder. I used a Hera Marker to mark the fold lines, then hand stitched it in place. I'd already quilted the actual cover (the pattern instructions suggest using fusible fleece, which doesn't need to be quilted, but I just used a piece of cotton wadding and machine quilted it very simply in a crosshatch design in a grey thread. Two smart fabric ties are stitched in place when the folder is constructed, and thes will allow the folder cover to expand as it gets filled up... ...I decided to quilt the inside slip pockets too, to make it a bit more sturdy. An A4 plastic project folder with pages of pockets fits in nicely (goodness only knows how long I've had this folder, but if you enlarge the picture you can see it wa spurchased from Woolworths! The pattern instructions suggest an A4 ringbinder will fit too... ...and here'surite recipes for the f the finished folder cover - I'm really pleased with this, it's the perfect project - pretty AND useful! I'll be able to keep all my Christmas lists in here, to remind me of presents to buy, what I've already bought, favourite recipes for the festive season, cards to write and jobs to be done. Hopefully this will make me much more organised in furture years too!
I've been working on this Many Thanks quilt for several weeks. Designed by Nancy Halvorsen of Art to Heart the original pattern uses raw edge applique, although I decided to use the needleturn applique method instead. Once all the blocks were pieced together, three borders were added. The first border was a scrappy one, made using a variety of coloured strips of fabric cut into random lengths. This was followed by a green border, (the same fabric will be used for the binding) and finally a wider, paler border... ...it was such a glorious day today, I couldn't resist doing a photoshoot outside in the sunshine! Now the borders are on, I'll pack this away for a few weeks while I deliberate over the quilting. This will give me the perfect opportunity to pratise my hand quilting, and I can doodle a few ideas before I return to it in a few weeks. Meanwhile, I've got a few festive projects that I need to get on with, as well as a few homemade Christmas gifts to make and I'm running out of time!
This project - designed by Nancy Halvorsen of Art to Heart - has been a super one to stitch, and it's been a great project to pratise my needleturn applique. Now the blocks have been pieced together, I just need to add the borders, then decide how it's going to be quilted. It may well be a great preat project to practise my hand quilting skills on too!
The final block - Roads That Lead Home - is finished. This block, like the others, has been hand embroidered and needleturn appliquéd, and the heart shaped button will be stitched in place once the quilt is finished. As you can see, I'd already joined the blocks together before I took a photograph! I'll share a picture of all the blocks tomorrow, then I just need to add three borders.
|
About me...Hi - welcome to my quilting blog! My passions are my family, my dog, my friends and sewing, not necessarily in that order! Archives
January 2025
Blogs I followUK shopsThese are the UK shops that I use to purchase my quilting supplies - fabrics and threads etc.
Australian linksScandinavian links |