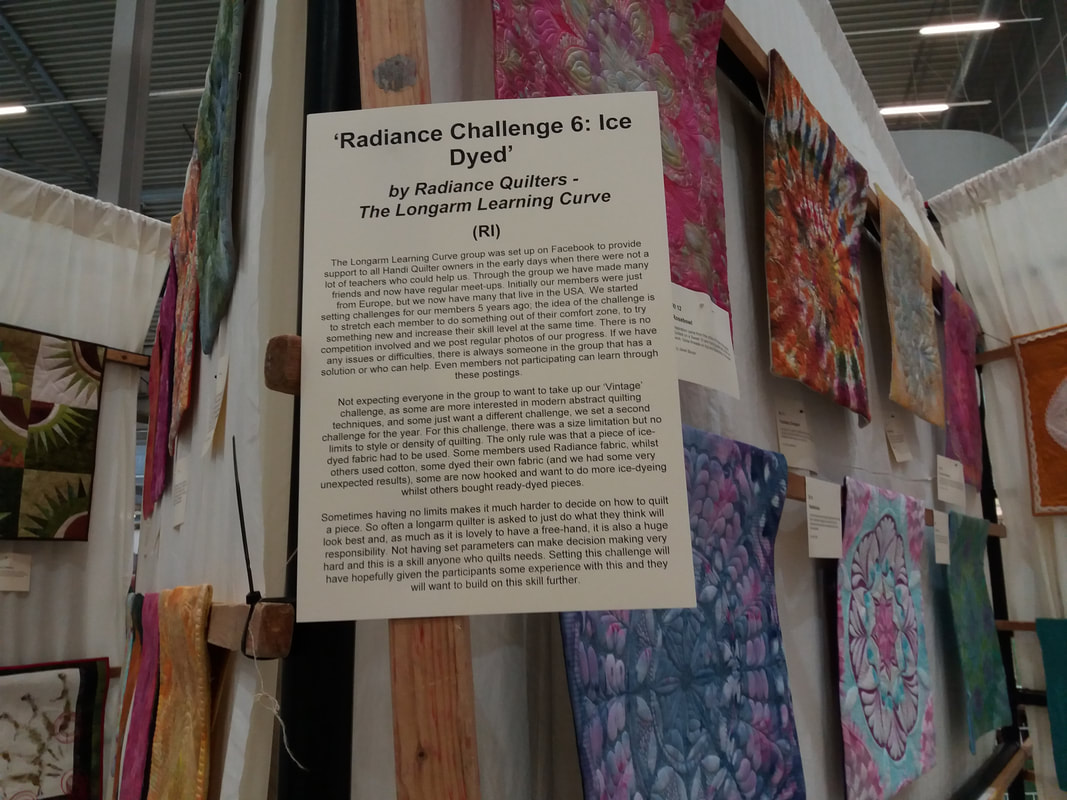
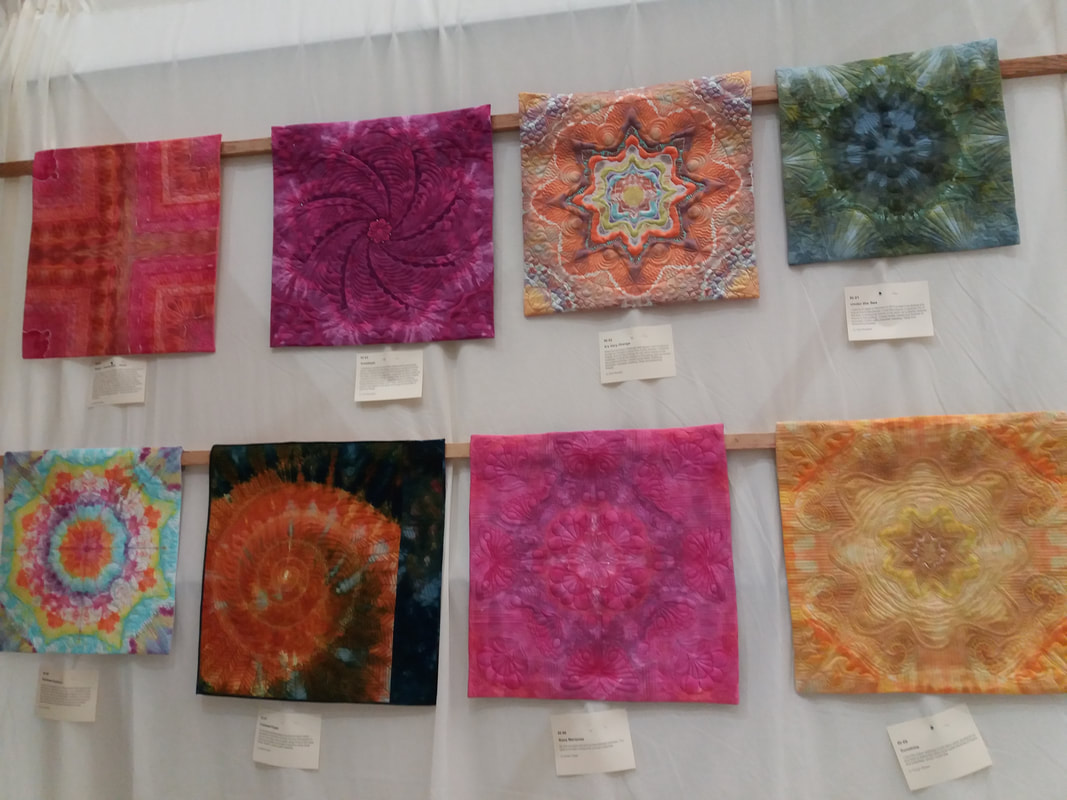
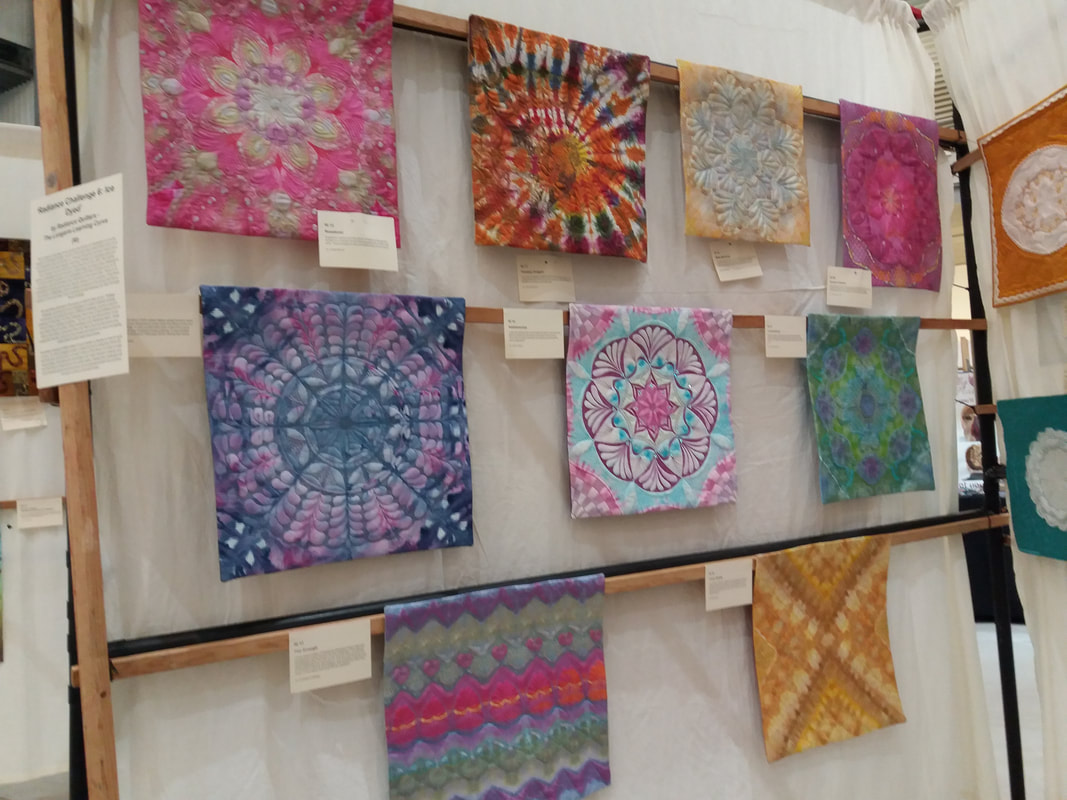
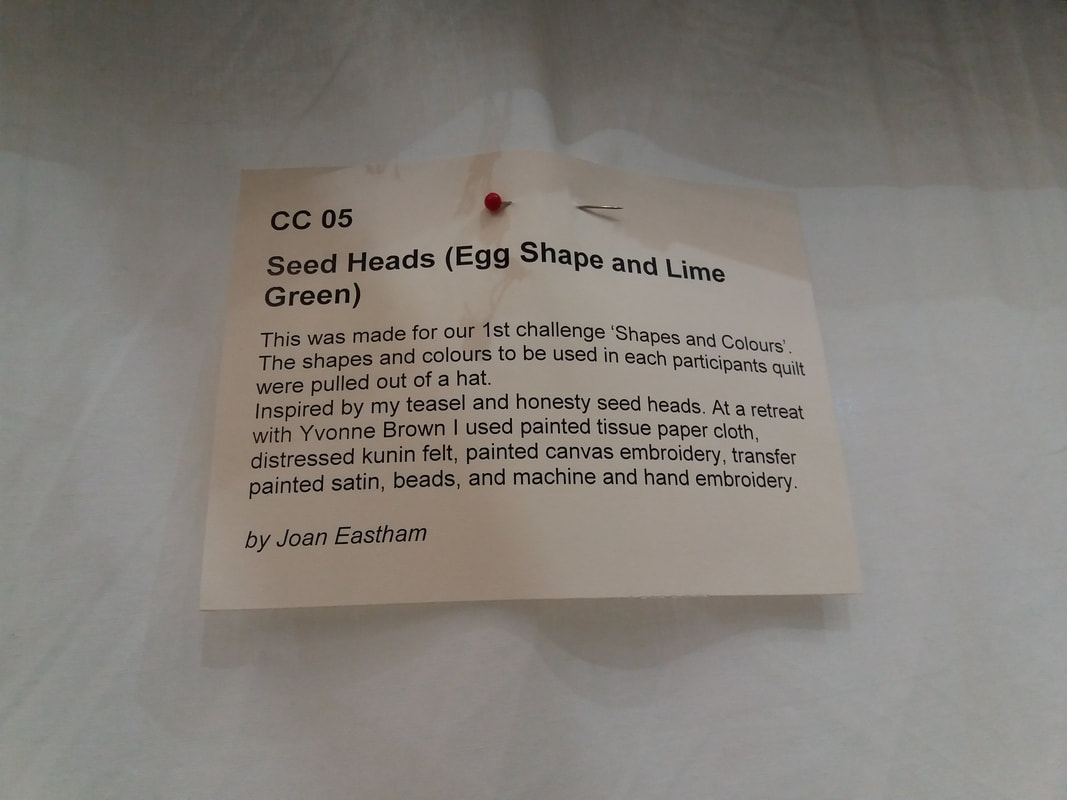
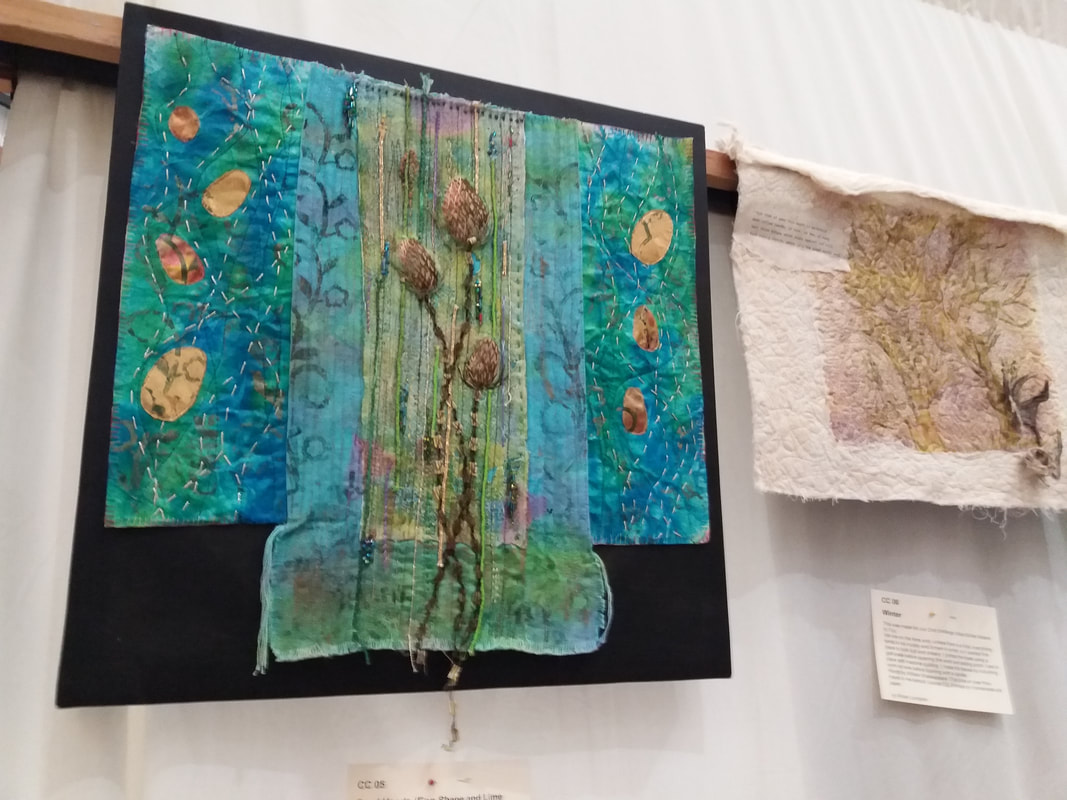
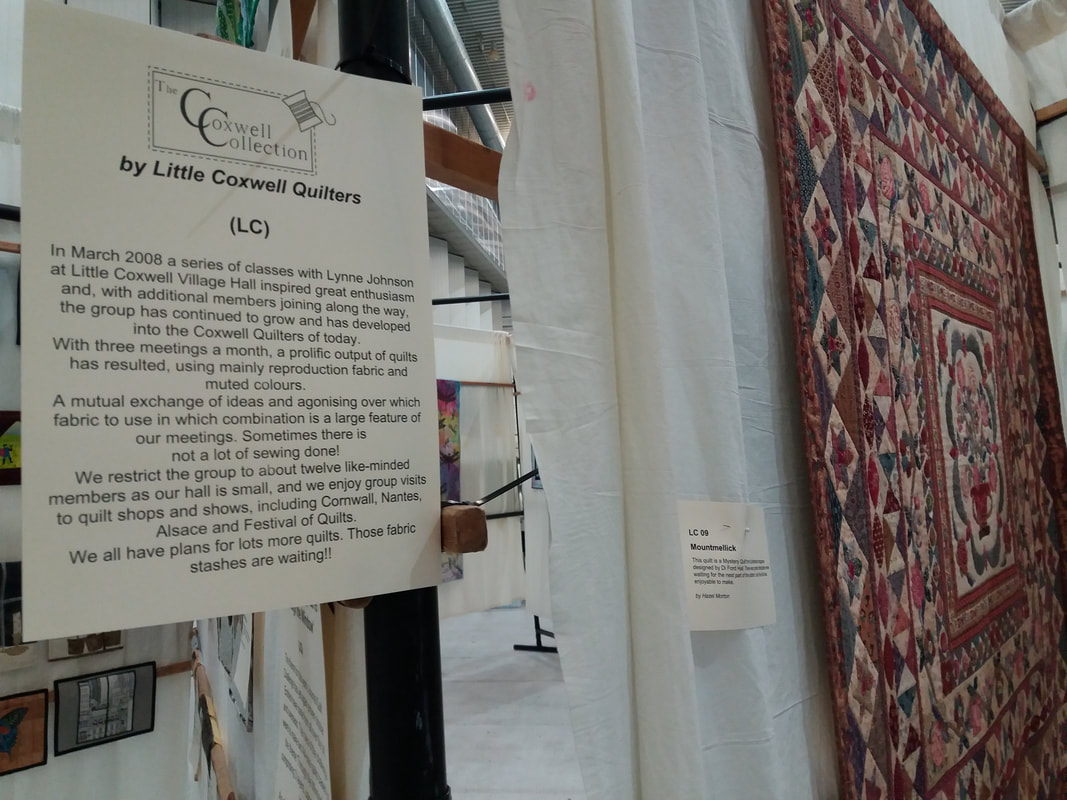
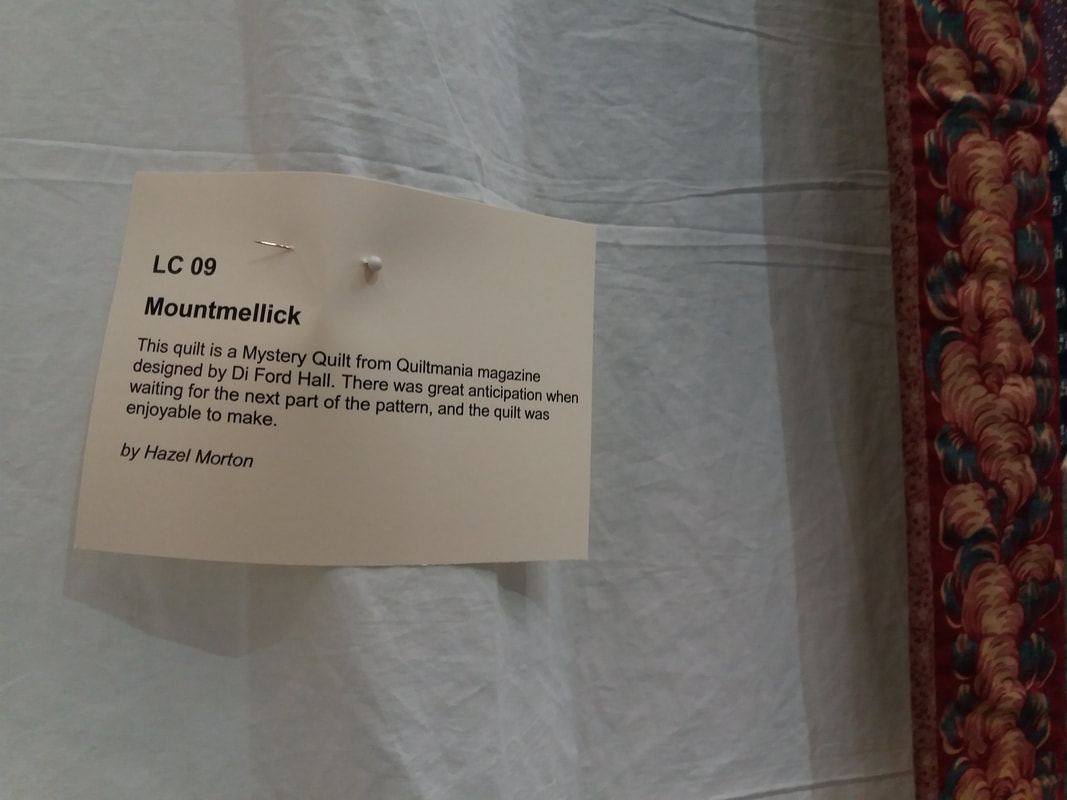
I've just had the most AMAZING week in Yorkshire, on a residential quilting course with Philippa Naylor. I had a super time, and was able to make this gorgeous New York Beauty wall hanging using some fabulous batik fabrics. The pieced borders and the pieced binding reflect the outer segments of the blocks, and a double row of piping was added for a pop of colour... 
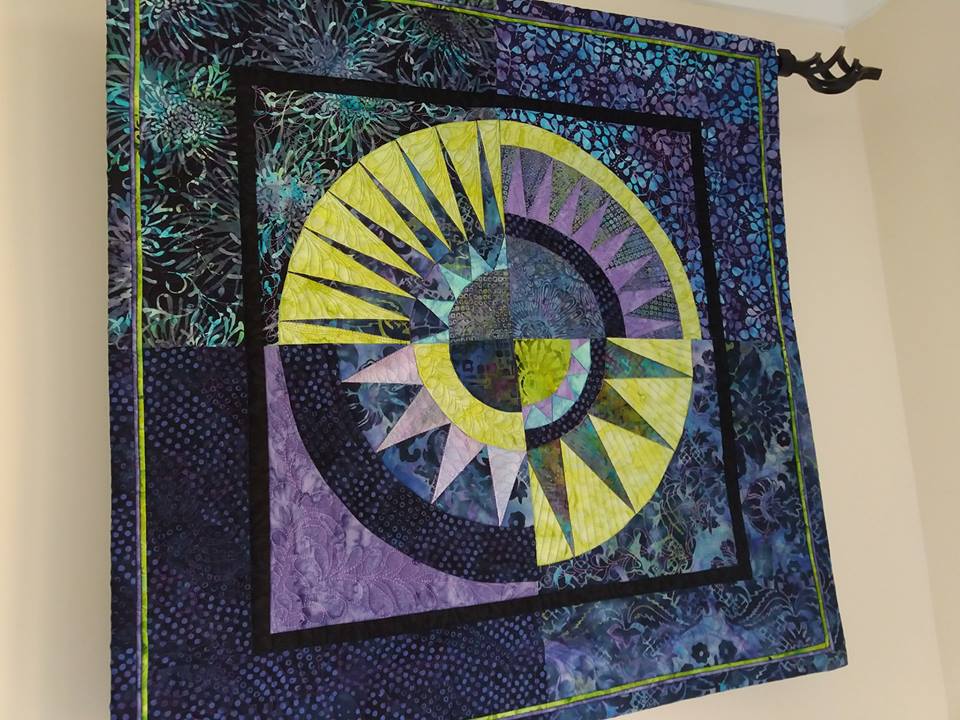
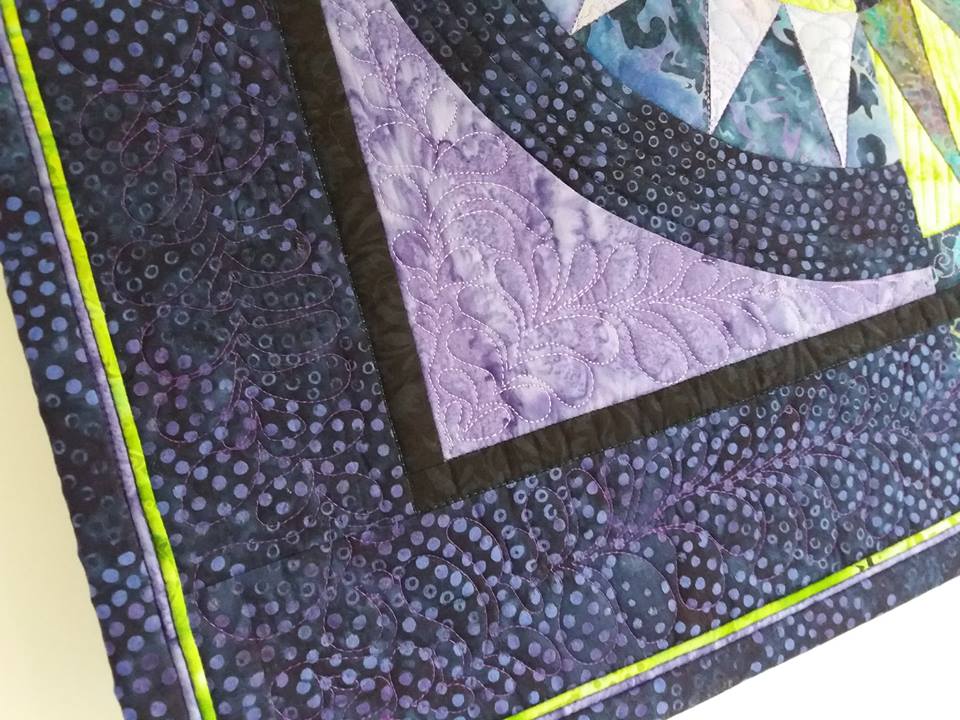
...under Philippa's expert guidance, I was able to practise my free motion machine quilting, using a selection of Aurifil threads. I quilted lots of feathers and twirls and loops and curls. These blocks were made initially using free patterns that I had downloaded from the internet, and printed onto very thin paper that easily tears away. Foundation paper piecing can take a while to perfect, but gives lovely precise, sharp points... 
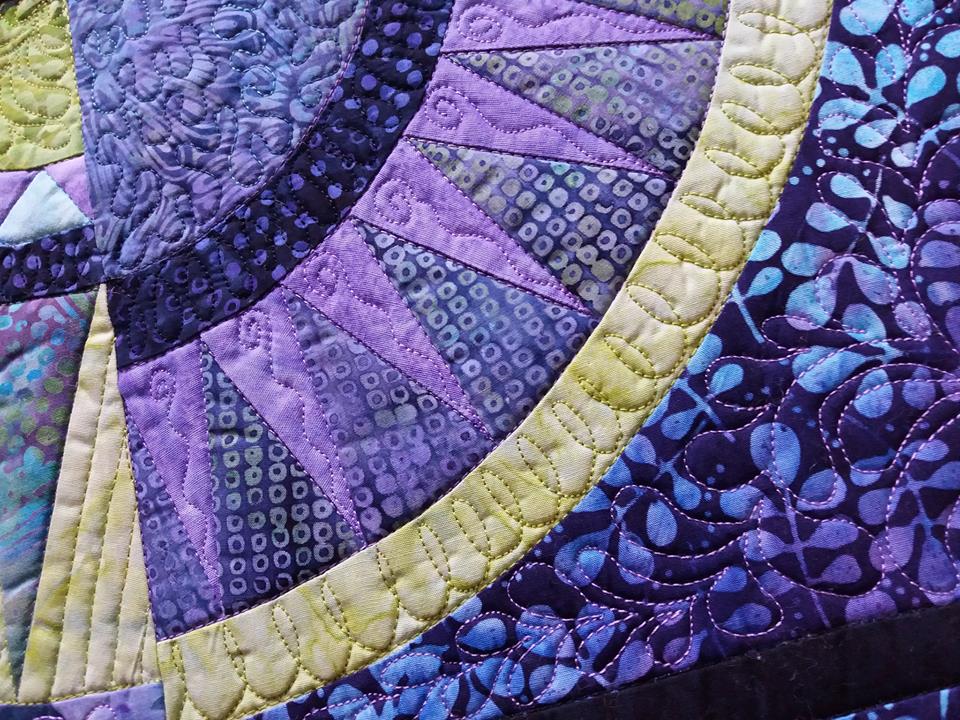
...once the quilting was completed, I added a pieced border to reflect the outer segment of the NYB blocks, then added a double row of piping. Finally the binding was stitched by machine to the font, folded over and hand stitched in place on the back. I absolutely LOVE this, and will try to use more free motion quilting in my projects, rather than my usual simple style of straight lines!
0 Comments
A couple of weeks ago, I went to the Spring Quilt Festival at Duxford, with 2 very special friends. Yesterday I shared some pictures of my favourite quilts, and today I'm sharing a few more pictures of some of the smaller quilts that were on display - they were truely amazing. We had such a great day out, and came home full of inspiration!
My favourite pattern for making quilted cosmetic bags is "Anna's Sminkepung" by the Norwegian designer AnnAKa. I used a selection of cream and white fabrics for this one, and trimmed it with some cream and white vintage lace. This was a gift for a special friend, who's also very crafty - and she was thrilled to bits with it! AnnAKa patterns are only available from Scandinavian quilt shops, and there are links to both Lappedilla (Norway) and Lapp-Elisa (Sweden) on the right-hand sidebar of my blog.
Little House Block Book, by Lynette Anderson Designs, is an ideal way of storing quilt blocks before they're stitched together. The centre panel is appliqued and hand embroidered, and is trimmed with a row of 3" Ohio Star blocks. I've used a selection of fabrics also designed by Lynette for the block book... ...I pieced the lower border and the backing, so I could use this gorgeous feature print from Lynette's Hollyhock Cottage collection. The block book has some firm card in-between the book outer and the lining to give it some structure, and is finished off with a pair of fabric handles which have been quilted... ...Lynette suggests using layers of felt for the pages, but I was too desperate to complete it so I used some 80/20 wadding for the pages instead. Maybe I'll redo this part in the future, as unfortunately the wadding pages are rather floppy. As you can see, this block keeper is great for storing my "Hearts and Happy Flowers" blocks!... ...this one is by the Australian designer Leanne Beasley, and I've put all 9 of my prepared blocks in my new block keeper so they're all stored neatly, ready for the hand embroidery and applique of the last few blocks. These have been patiently waiting while I made a few other projects, and I'm looking forward to getting back to stitching these again soon as I haven't picked it up since I finished block 5.
This block had been prepared absolutely ages ago, and tucked away in a "safe place" - after weeks of searching for it, I found it safely tucked inside my box of Lynette patterns!! This morning the wool applique flowers have been secured in place with some blanket stitch using DMC embroidery threads... ...once the appliqued block is pressed and trimmed to size, these 3" Ohio Star patchwork blocks will be added to the lower edge. I'd used a selection of fabrics designed by Lynette for these blocks, and love how these colours work well together even though they are from different collections. This pattern is "Little House Block Book" and will be a place for storing my quilt blocks - the pattern I've got is quite old, and the instructions are for machine piecing the Ohio Star blocks. A newer version of the patterns has instructions for constructing the blocks using EPP, and a set of acrylic templates and pre-cut papers is also available.
I like having a runner on my dining table, and have got quite a collection to choose from! I couldn't resist getting this kit from Cross Patch to make another one - This pattern is Tiny Town Tablerunner, designed by the Australian designer Anni Downs of Hatched and Patched, and I particularly liked this pattern as the runner can be made smaller or larger by using a few more or less rows to the middle section. I'm sure when Mr F sees this, he'll roll his eyes and mutter under his breath "she's got enough table runners to display a different one every week of the year" haha!
The EPP Storage Carry All (pattern by Lynette Anderson Designs) is filled to the brim with pockets galore, including lots of plastic ones with zippers. The original pattern uses continuous zipper, but as I didn't have any I used TWELVE separate zippers instead. I've already started sorting out a few of my EPP papers and templates - these plastic pockets are really useful, and the zippers keep everything safe and secure... ...the Carry All opens out to reveal even more pockets, closed by zippers. The plastic pockets are all neatened by binding strips that are added to the top and bottom. I found using baking parchment underneath the plastic a great help as it prevented the plastic from sticking to the sewing machine. Also a really sharp needle helps, and I used a Superior Titanium Topstitch size 70 needle to sew through all the layers. The titanium needles keep really sharp, and it sewed through everything really easily. I also used a walking foot to sew the binding on the plastic as that helps, and Lynette recommends using a teflon foot... ...anyone else making this please note there is a missing instruction in the construction of the pocket panel. The pattern says once the pocket panel is completed, attach it to the wadding and lining by stitching vertical dividing lines on the plastic through all layers but omits an instruction for sewing along the binding ABOVE the zipper to ensure the contents stay in the individual pockets. Lynette is aware and apparently this has been amended for the next print run. Also, some of the wadding for the pocket panels is missing from the cutting instructions (says cut x1 of each size and you need x2 of each size). Finally, there are instructions in the pattern for making the plastic pocket that goes on top of the slip pocket but it is missing from the cutting instructions. Hope that helps!
Drum roll please - the EPP Storage Carry All is completed! This pattern is by Lynette Anderson Designs, and I used fabrics from the Hollyhock Cottage collection to make this, also designed by Lynette. I'd had these fabrics for simply ages, saving them for something special, and decided it was about time I used them. The front of the Carry All has been hand embroidered using a dark brown DMC thread, and has been hand appliqued. Pictures of the inside the Carry All, showing LOTS of plastic pockets will follow tomorrow!
|
About me...Hi - welcome to my quilting blog! My passions are my family, my dog, my friends and sewing, not necessarily in that order! Archives
January 2025
Blogs I followUK shopsThese are the UK shops that I use to purchase my quilting supplies - fabrics and threads etc.
Australian linksScandinavian links |