Nicola Foreman Quilts
  • BLOG
  • BAGS
  • CUSHIONS
  • QUILTYSTUFF
  • QUILTS
  • TABLERUNNERS
  • WALL HANGINGS
  • CONTACT ME

How To Make A Pencil Case - A Tutorial

4/3/2012

 
Well after I wrote a tutorial last week "How To Make A Lanyard" I thought I'd have a go at writing a tutorial on "How To Make A Pencil Case" and hope you'll have a go at making one too. There are a lot of pictures with this tutorial, but I have tried to make it as simple as possible.

REQUIREMENTS:
Scraps of fabric to make a rectangle approx 12" x 10"
Backing fabric approx 13" x 11"
Strip of fabric for binding and tabs approx 1½" wide 
Wadding
14" zipper
Quilting thread
Ususal sewing supplies - rotary cutter, cutting board, ruler, pins etc.
Sewing machine in good working order, walking foot - edge foot and zipper foot optional.
Picture
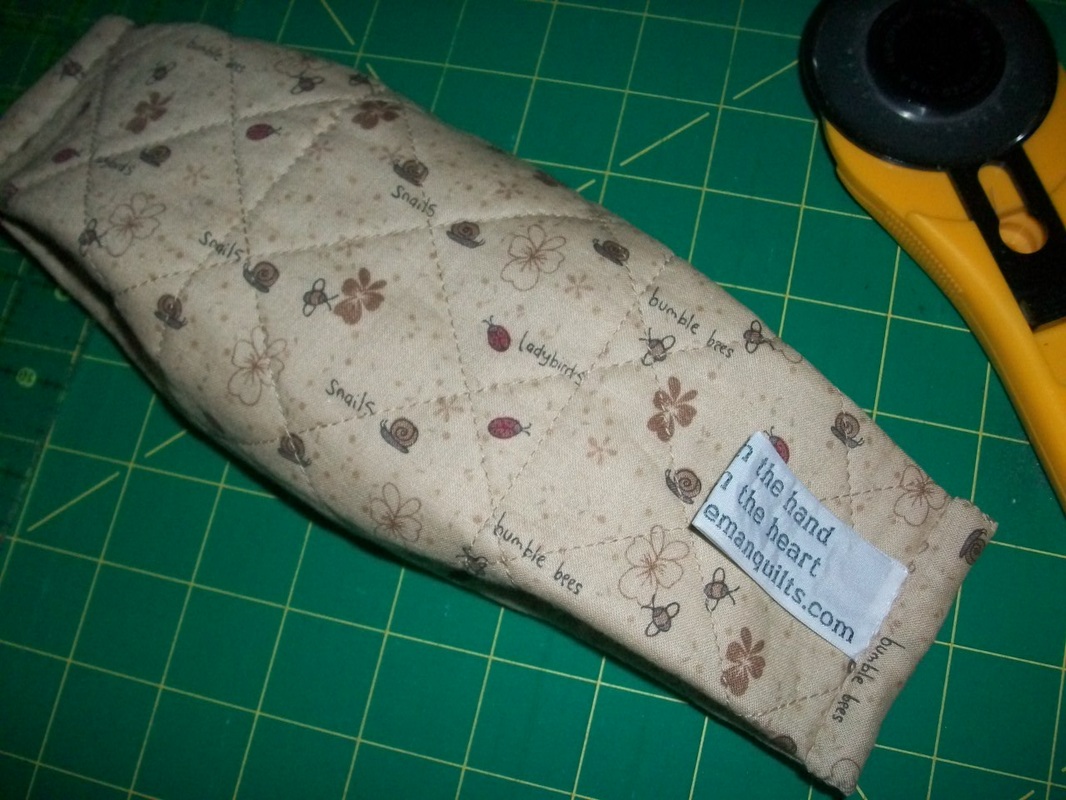
I have chosen a gorgeous range of fabrics for this project, "Secret Garden" by Lynette Anderson for Lecien. Thank you so much fro this fabric Lynette - you can see I'm still making alot of projects with it!!.....

Picture
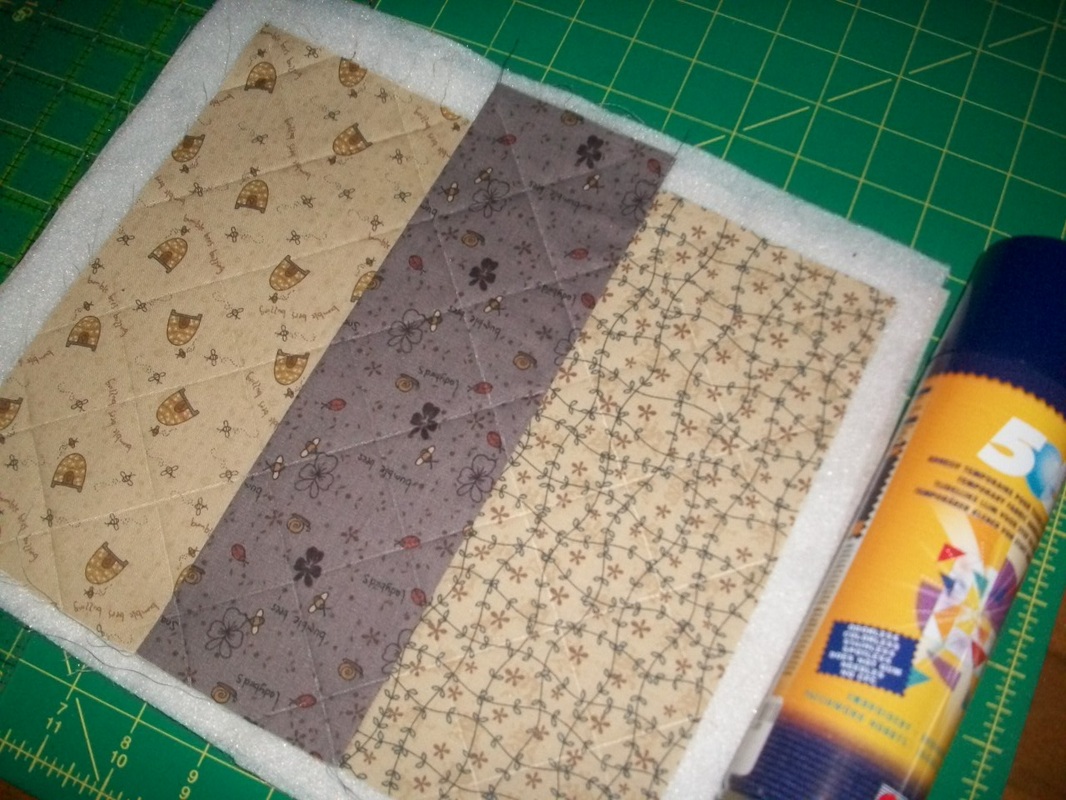
.....I start with a rectangle of fabric for the outer part of the pencil case, approx 12" x 10" - this can be a single piece of feature fabric or a combination of fabrics pieced together. This is then layered with a slightly larger backing fabric and a piece of wadding - and made into a simple quilt sandwich. I have spray-basted these layers together with some 501 spray glue, and then quilt it as you like - straight rows, cross-hatch, wiggleywoo - the choice is yours.....

Picture
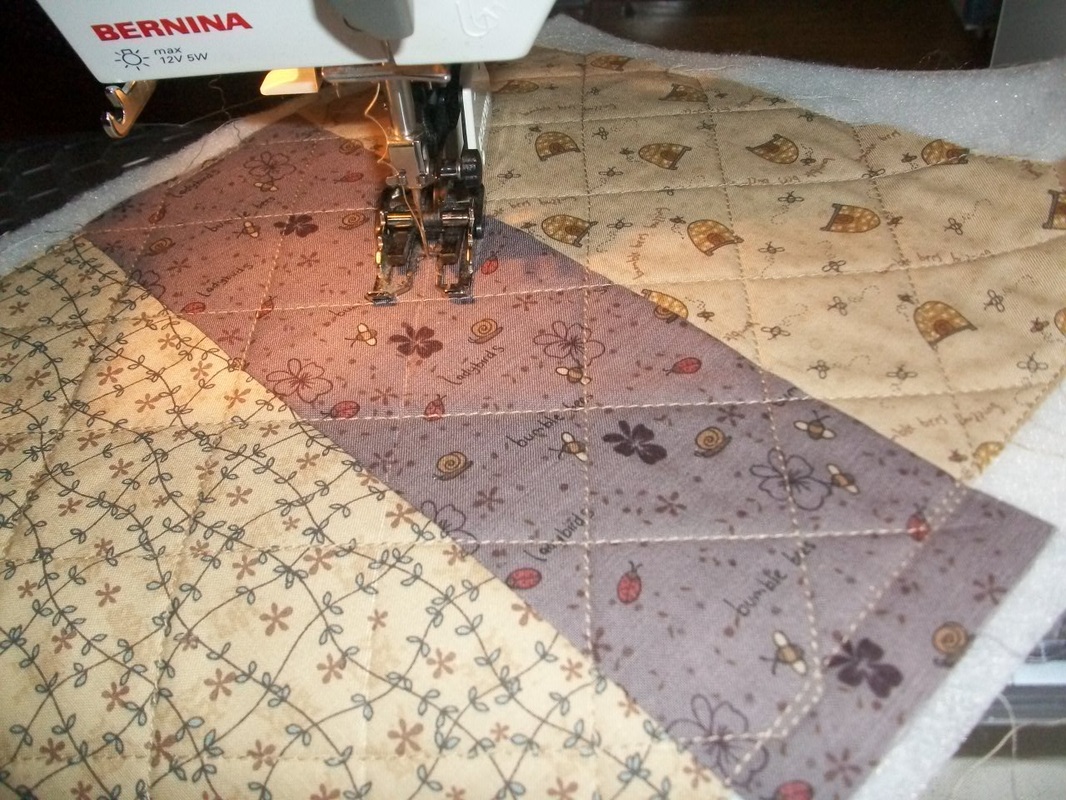
.....here you can see I have already marked a cross-hatch pattern, spacing the lines about 1½" apart. I have used a Mettler quilting thread for this project, in a shade to co-ordinate with my fabrics. I find it much easier even for small pmall projects like this to use a walking foot....


Picture
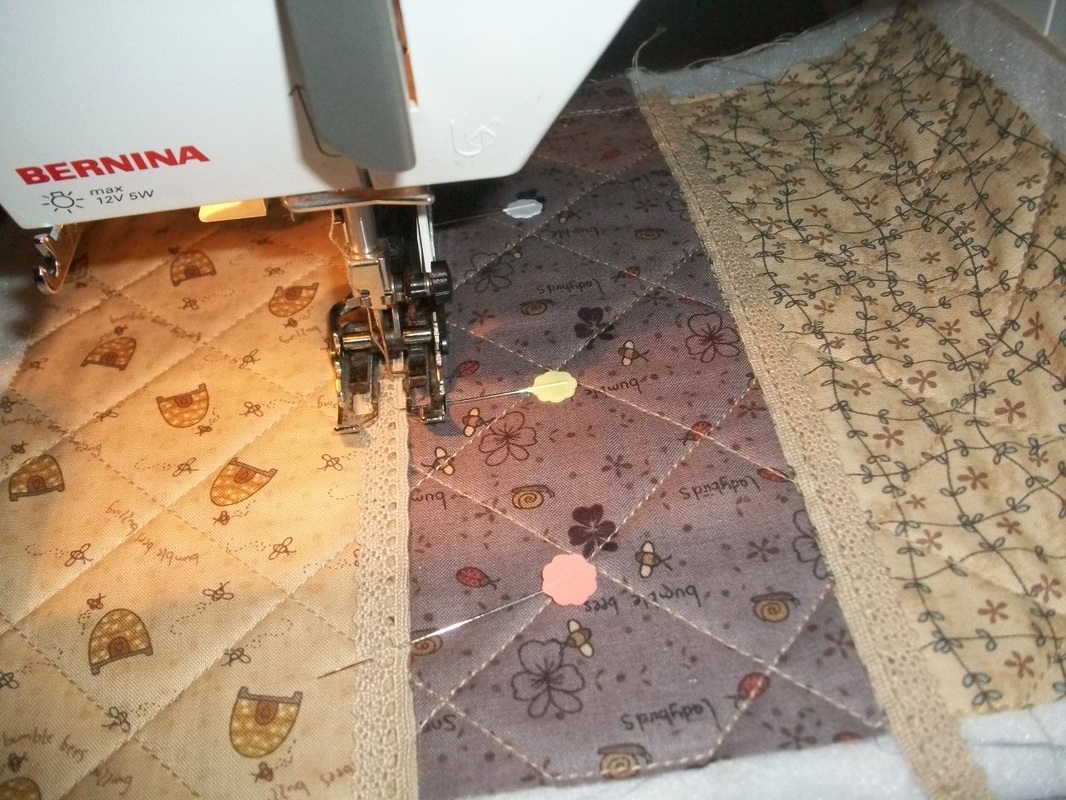
.....if you want to add any trimmings, now is the time to do it. This was has been trimmed with some vintage lace, along the centre panel.....

Picture
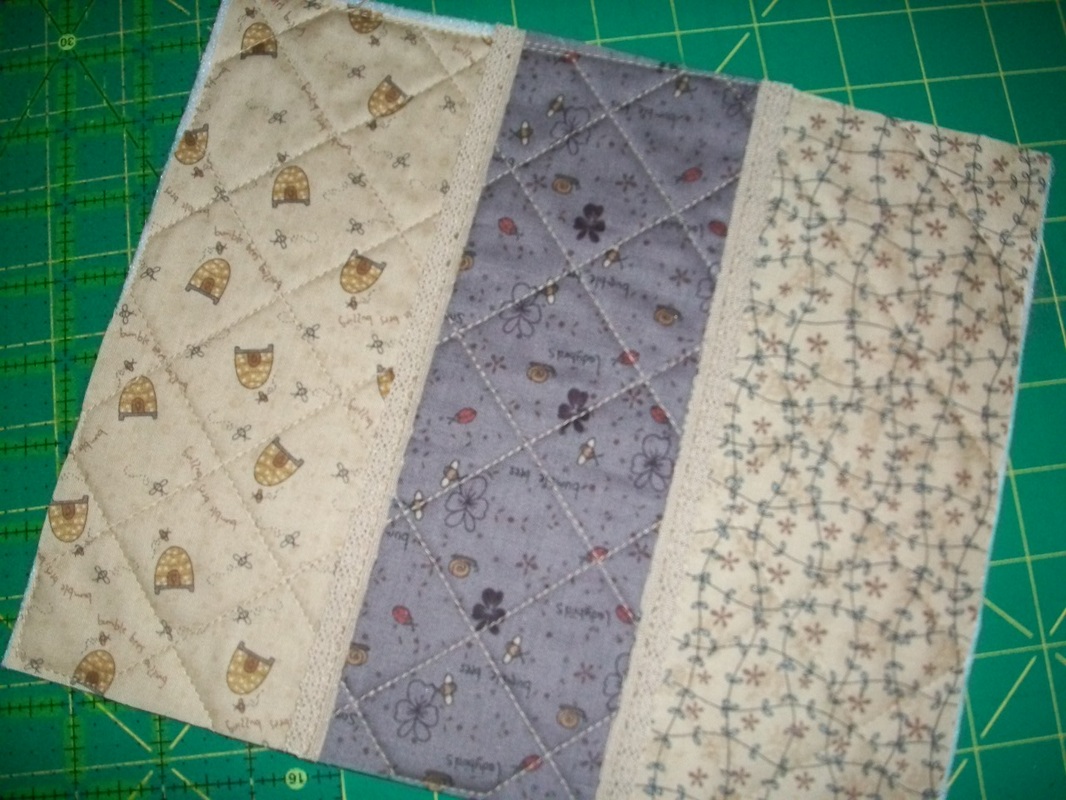
.....once the rectangle is quilted and decorated, trim it to size, using your rotary cutter and cutting board. This one has been trimmed to 9" x 11" - remember the longest measurement is along the top and bottom, where the zipper will be sewn.....

Picture
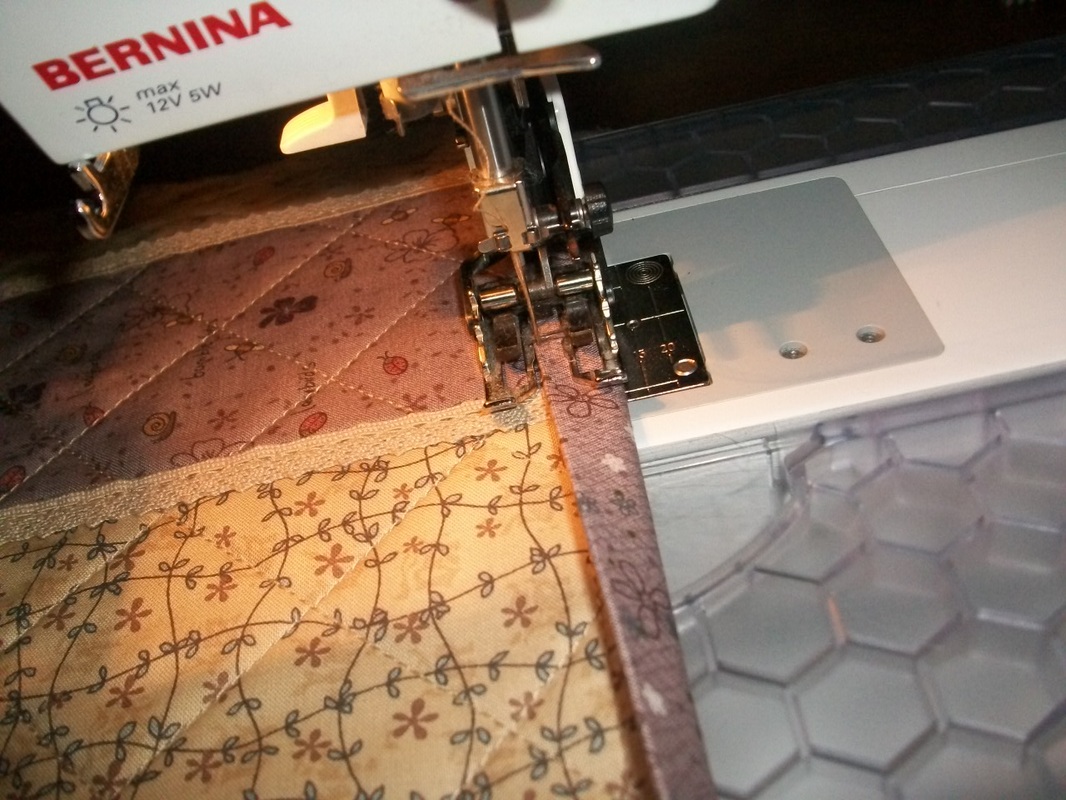
.....then the two longest edges are neatened with a strip of binding fabric. Cut 2 strips of fabric just longer than the pencil case, and sew to the wrong side along the longest edge, then pressing the binding over to the right side, press firmly and stich close to the edge. You can use an edge foot for this, but I prefer to use my walking foot, with the needle position set to the left, and repeat for binding the oppasite edge.....

Picture
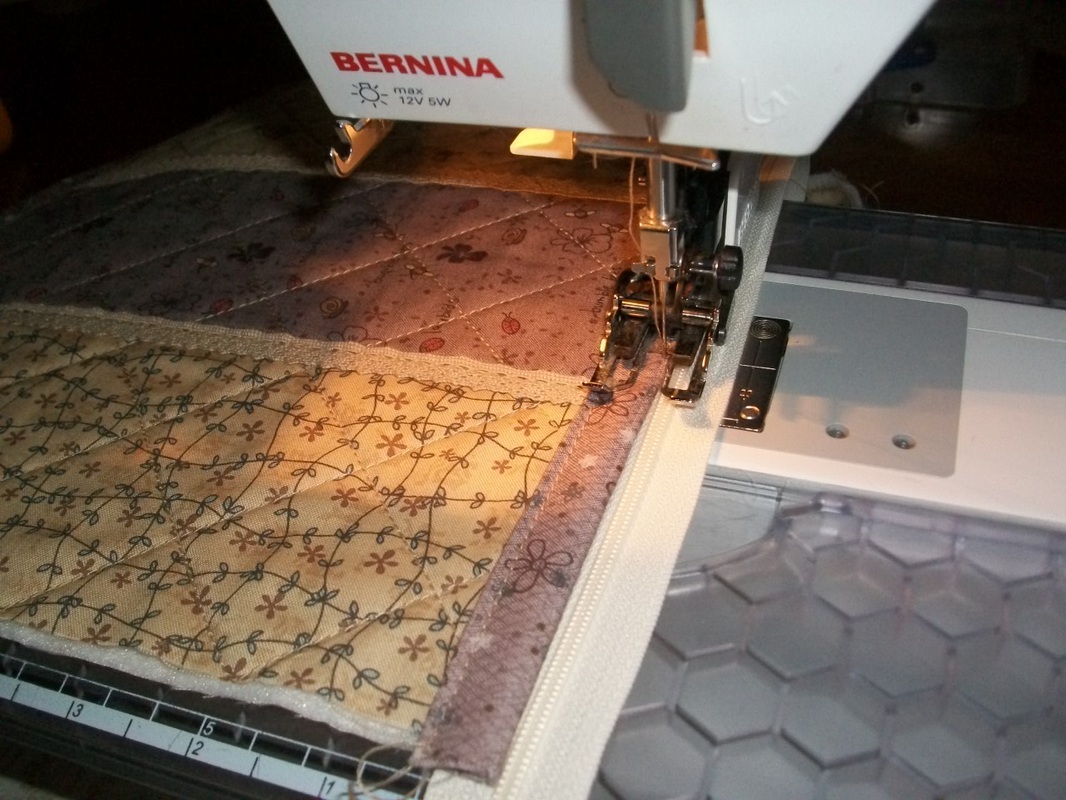
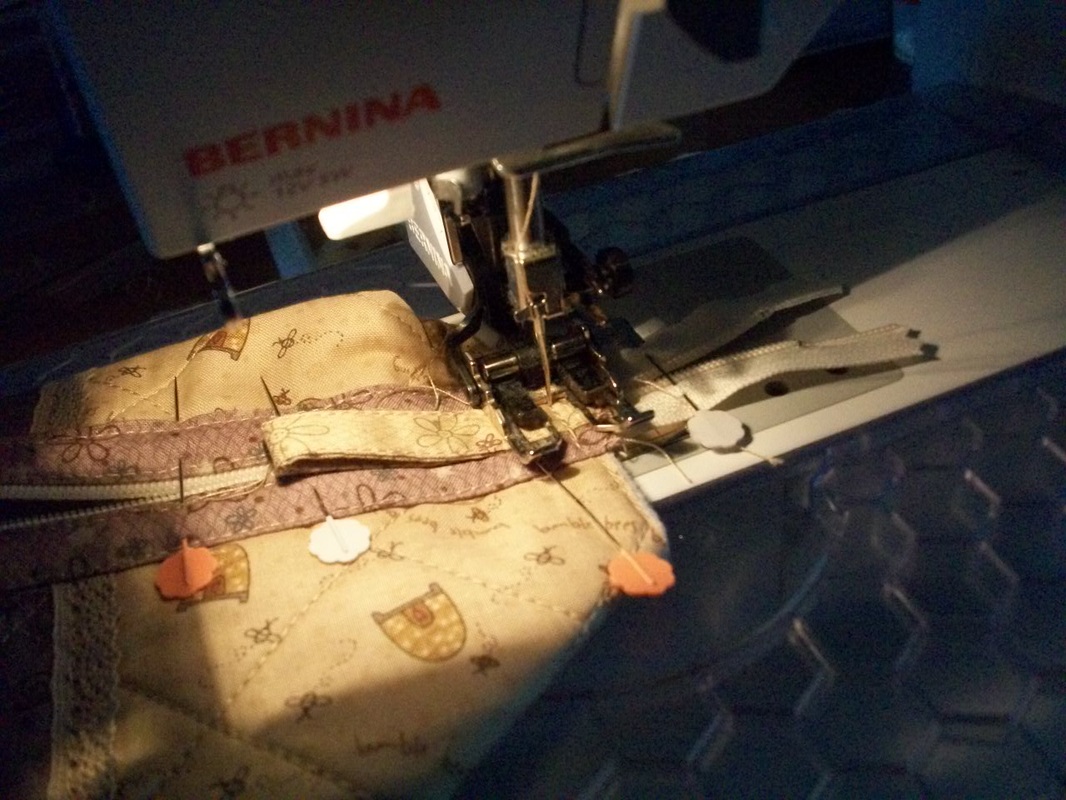
.....the trickiest part is sewing in the zipper. I prefer to use a longer zipper than needed, and cut it down to size. Again, I have used a walking foot for this, as it saves changing feet on the machine..... 

Picture
.....open the zipper fully and machine the other side of the zipper into place. It is much easier to use a longer zipper than you need and trim it to size after you have sewn it into place. For this project I used a zipper about 14" long.....

Picture
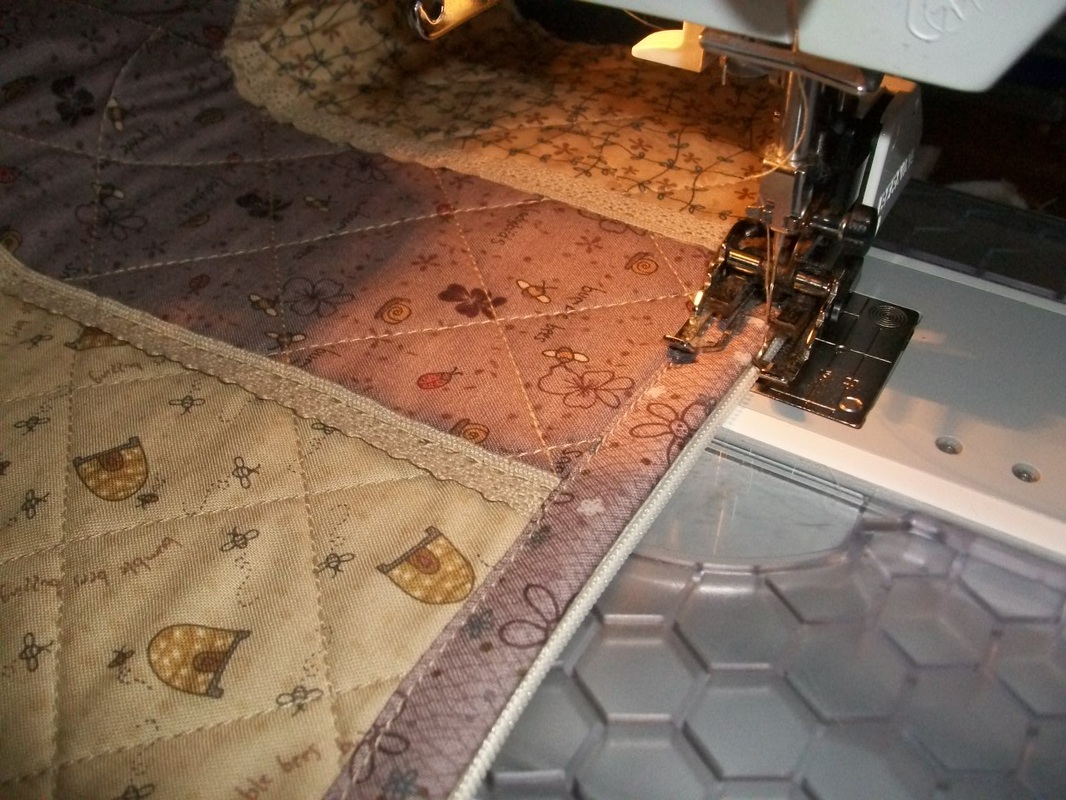
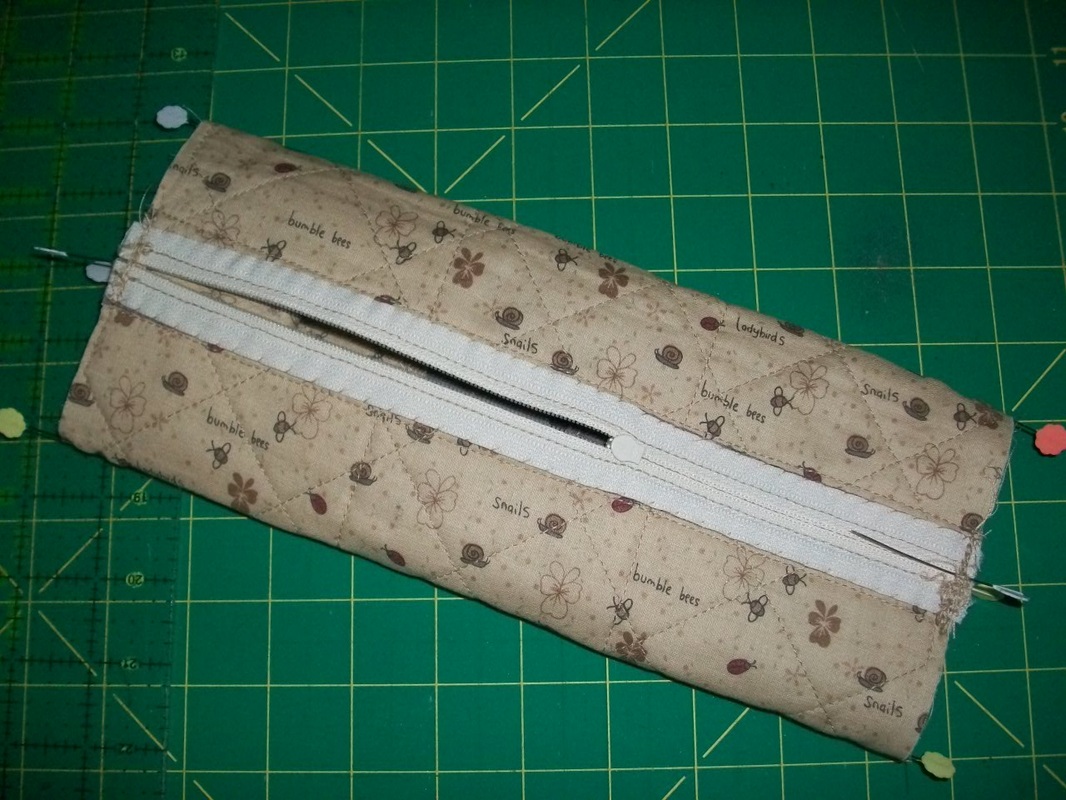
.....turn the pencil-case inside out and neaten the edges of the zipper. This is done by slipstitching the edges into place by hand - it might seem like a lot of extra work, but it will be worth the extra effort - I always prefer to finish it off by hand.....

Picture
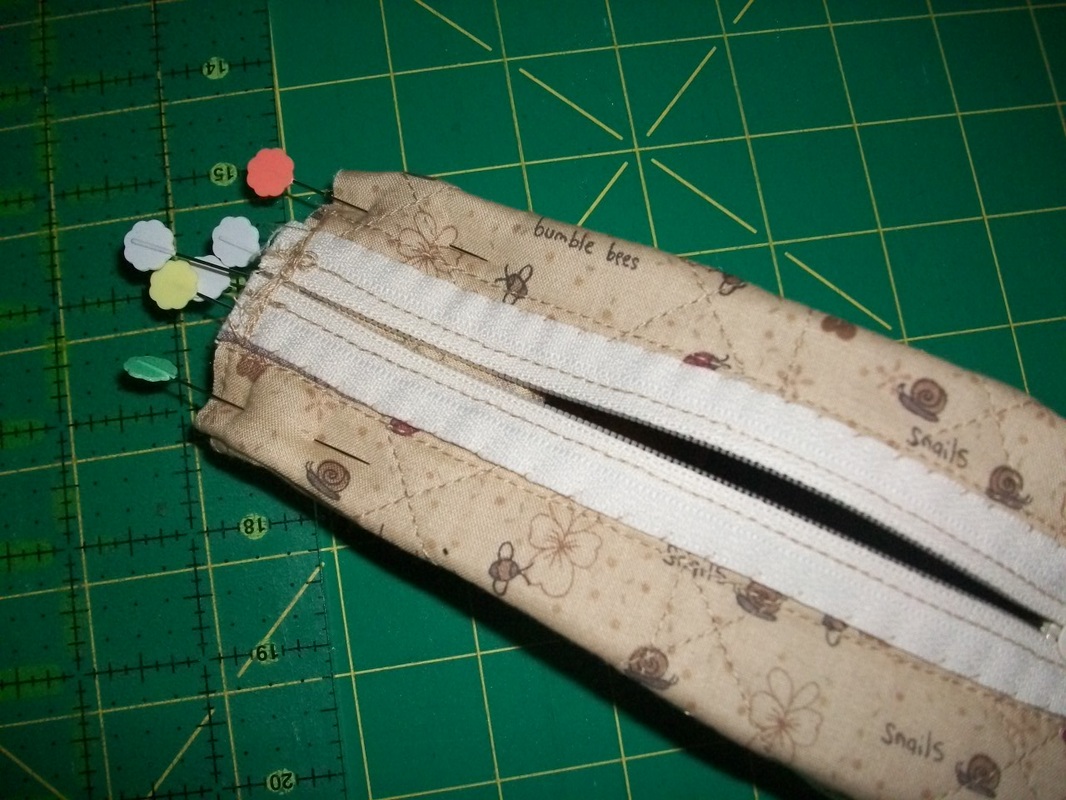
.....then sew some securing stitches over the binding and the zipper to make sure the zipper pull does not come off the ends before you have finished,  making sure you have opened the zipper first then you can trim it to size - and sew a small tag to each end over the zipper.....

Picture
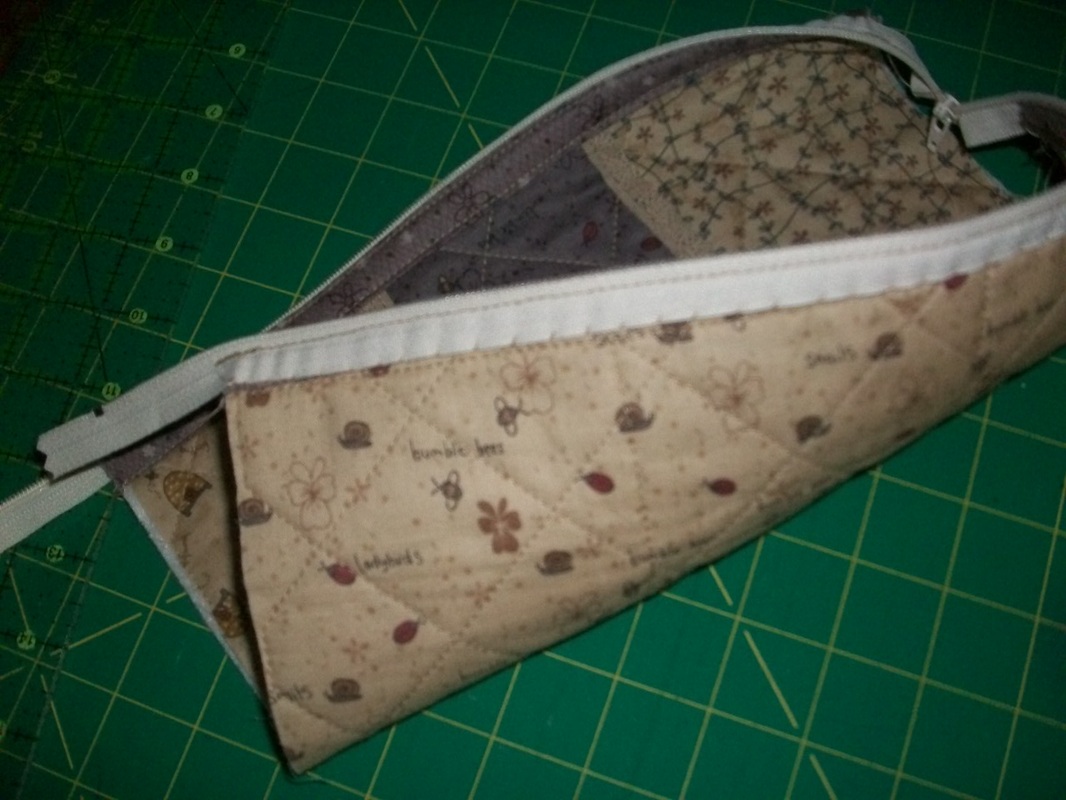
.....this shows a picture of the small tag at each end - you will hold this to open and close the pencil case when it is finished. Check your pencil case opens and closes smoothly before moving on to the next stage.....

Picture
.....turn the pencil case inside out, and mark the centre front and centre back with pins, then mark the 2 sides with pins.....

Picture
.....pleat the sides in to almost meet the centres - this is a bit tricky, so use plenty of pins to hold every thing in place. Make sure the zipper is open at least halfway, so you can turn it through the right way once you have sewn the side seams!.....

Picture
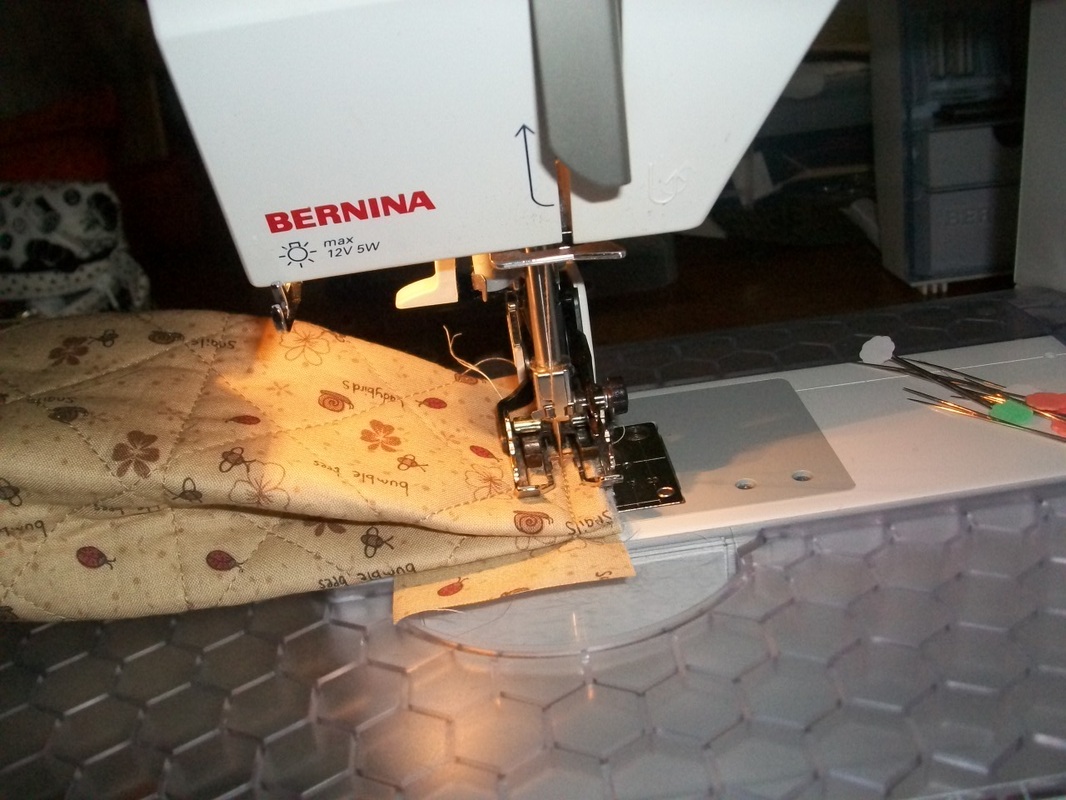
.....sew through all layers, taking care not to break your needle when you sew over the zipper, and sew a few stitches in reverse at the beginning and end of the seam to secure.You can see I have also sewn a small piece of fabric underneath, this will become the binding to neaten the seam - I do not like to see lots of raw edges.....

Picture
.....the inside seams are neatened with a small strip of single fold binding, folded over then this is then slip stitched into place by hand - oh, and I have added one of my labels here too.....

Picture
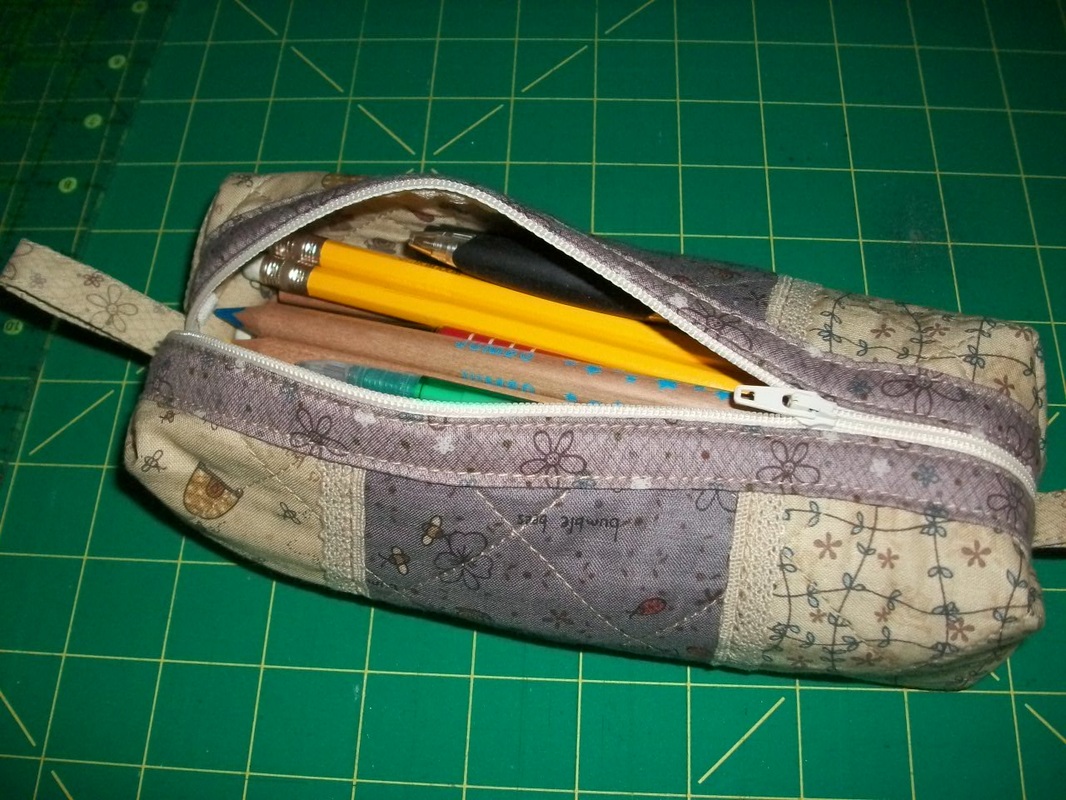
.....turn it the right way through, and you have your pencil case. You can experiment with different sizes, and make a larger bag. I'd love to read your comments about what you think of this tutorial.
* This style of bag is also useful as a cosmetic bag too!

Julie
4/3/2012 02:16:32 pm

Hi Nicola,
I am so thrilled that you are doing tutorials. I loved it and appreciate the time and effort it must have taken you. Having said that, ha ha if you are taking requests, I am sure many of us would love a tutorial on one of your beautiful 'Anna's Sminkepung' bags. Well done!

Nicola link
5/3/2012 12:46:00 am

Sorry Julie - can't do tutorials on AnnAKa patterns - watch this space though as I'm currently whipping up a tablerunner of my own design!!

Tanya link
4/3/2012 03:07:39 pm

Thank you for a great tutorial. I will have to try it out. :)

Nicola link
5/3/2012 12:47:30 am

Thanks Tanya - let me know how you get on!! I'm currently writing a couple of tutorials for my own designs !!

barbara carter link
4/3/2012 03:19:56 pm

awesome thank you so much I love it.

Nicola link
5/3/2012 12:48:35 am

Thanks Barbara - there'll be no stopping me now!!

Anne-Lise Engvik link
15/3/2012 11:22:30 pm

How many beatiful things you make :-) I have made this pencil case in several sizes. My sister ordered realy big ones, she put's her underwear in them when she goes abroad. Clean ones in one and dirty in another one :-) She likes to organize her suitcase :-) I love to peek in all this lovely bloog's, maby I should made one myself some day :-)


Comments are closed.
    Picture

    About me...

    Hi - welcome to my quilting blog! My passions are my family, my dog, my friends and sewing, not necessarily in that order! 
    ​​I live in Suffolk, not far from the coast, surrounded by the beautiful countryside.  
    ​If you want to share or pin any of my pictures, please link back to my blog.

    Picture
    Picture
    Picture
    Picture
    Picture
    Picture
    Picture
    Picture
    Picture
    Picture
    Picture
    Picture
    Picture
    Picture
    Picture
    Picture
    Picture
    Picture
    Picture
    Picture
    Picture
    Picture
    Picture
    Picture
    Picture
    Picture
    Picture
    Picture
    Picture
    Picture
    Picture
    Picture
    Picture

    Archives

    March 2025
    February 2025
    January 2025
    December 2024
    November 2024
    October 2024
    September 2024
    August 2024
    July 2024
    June 2024
    May 2024
    April 2024
    March 2024
    February 2024
    January 2024
    December 2023
    November 2023
    October 2023
    September 2023
    August 2023
    July 2023
    June 2023
    May 2023
    April 2023
    March 2023
    February 2023
    January 2023
    December 2022
    November 2022
    October 2022
    September 2022
    August 2022
    July 2022
    June 2022
    May 2022
    April 2022
    March 2022
    February 2022
    January 2022
    December 2021
    November 2021
    October 2021
    September 2021
    August 2021
    July 2021
    June 2021
    May 2021
    April 2021
    March 2021
    February 2021
    January 2021
    December 2020
    November 2020
    October 2020
    September 2020
    August 2020
    July 2020
    June 2020
    May 2020
    April 2020
    March 2020
    February 2020
    January 2020
    December 2019
    November 2019
    October 2019
    September 2019
    August 2019
    July 2019
    June 2019
    May 2019
    April 2019
    March 2019
    February 2019
    January 2019
    December 2018
    November 2018
    October 2018
    September 2018
    August 2018
    July 2018
    June 2018
    May 2018
    April 2018
    March 2018
    February 2018
    January 2018
    December 2017
    November 2017
    October 2017
    September 2017
    August 2017
    July 2017
    June 2017
    May 2017
    April 2017
    March 2017
    February 2017
    January 2017
    December 2016
    November 2016
    October 2016
    September 2016
    August 2016
    July 2016
    June 2016
    May 2016
    April 2016
    March 2016
    February 2016
    January 2016
    December 2015
    November 2015
    October 2015
    September 2015
    August 2015
    July 2015
    June 2015
    May 2015
    April 2015
    March 2015
    February 2015
    January 2015
    December 2014
    November 2014
    October 2014
    September 2014
    August 2014
    July 2014
    June 2014
    May 2014
    April 2014
    March 2014
    February 2014
    January 2014
    December 2013
    November 2013
    October 2013
    September 2013
    August 2013
    July 2013
    June 2013
    May 2013
    April 2013
    March 2013
    February 2013
    January 2013
    December 2012
    November 2012
    October 2012
    September 2012
    August 2012
    July 2012
    June 2012
    May 2012
    April 2012
    March 2012
    February 2012
    January 2012
    December 2011
    November 2011
    October 2011
    September 2011
    August 2011
    July 2011
    June 2011
    May 2011
    April 2011
    March 2011
    February 2011
    January 2011
    December 2010
    November 2010
    October 2010

    RSS Feed

    Picture
    Picture

    Blogs I follow

    A Quilt Lady
    A Quilting Life
    Abyquilt
    Anne-Grethe's quiltblog
    Anne Marie Quilt
    Bente Malm Quilte-Design
    Bloom
    Cinderberry Styitches
    Daisy made it
    Dilly Dimple
    Karis Quilterier
    Evas Quilterom
    Erickaeckles
    Fantasia Yarns
    Gail Pan Designs
    Hanne's Quilt Corner
    Halfpenny Home
    I'm a Ginger Monkey
    J-quilts
    Just Jude Designs
    Kviltstina
    Leanne's House
    Liv Aagots Quilteblogg
    Lily's Quilts
    Litamora's Quilt & Design
    Lynette Anderson Designs
    Merete's Quiltestue
    Mona's quiltblog
    Pam's Paradise Stitching
    Pia Si Sia
    Random Ramblings
    Sigrun's blog
    Sølvi's blog
    U-handblog
    ZewNice

     UK shops

    These are the UK shops that I use to purchase my quilting supplies - fabrics and threads etc.
    Bramblepatch
    Buttonberry
    Coast and Country Crafts
    Craft Den
    Cross Patch
    Emma's Fabric Studio
    Fiona's Fabrics
    Glenroy Designs
    Halfpenny Home
    Hulu
    J-quilts
    KIS Quilting
    Patchwork Chicks
    Quilter's Cloth
    Quilters Haven
    Sew and So's
    The Eternal Maker
    The Fat Quarters
    The Quilt Room
    U-handbag

    Australian links

    Cookies and Cream Craft
    Homespun magazine
    Little Quilt Store
    Quilt Fabric Delights
    Under The Mulberry Tree

    Scandinavian links

    Lapp-Elisa Quilts HB
    Lappedesign
    Lappedilla AS
    Myquilt
    Northern Quilts
    Quiltegården
    Quiltekroken
    Quiltemagasinet
    Quiltespecialisten
    Sy-Sammen