A few weeks ago I bought a gorgeous charm pack - "Windermere" by Brenda Riddle Designs for Moda, from KIS Quilting Ltd in Ipswich. This collection of fabric is really pretty and was just perfect for the project that I had in mind. I also bought some yardage of one of the prints in this range from Pretty Fabric and Trims (Sarah always pays such attention to detail when she wraps up orders)... ...the charm squares were cut into quarters - these 2.5" squares stitched together really quickly on my new Bernina 570QE. It's an absolute dream sewing machine! The parcel from Pretty Fabric and Trims had the most gorgeous fabric inside that was used for the backing... ...this project was layered up with cotton batting, and quilted very simply in straight rows, using Aurifil 40wt thread and a Superior Titanium Topstitch needle. These rows are all 0.5" apart, the edge of the walking foot was used as a guide both for the spacing and keeping the rows straight. One of my labels was machined into place across a corner, stitched through all layers before the binding was attached. Binding strips were cut at 3.5" then folded in half, machine stitched to the front of the project and then folded over to the back. Clover Wonder Clips are much easier to use than pins, and are especially good if you're sewing through thick layers or plastic... ...I used the same Aurifil 40wt thread that I'd used for the quilting to hand sew the binding in place. Now the project is complete and it's time for a photoshoot - and once it's been delivered I'll share a picture on here and show you what it looks like!
0 Comments
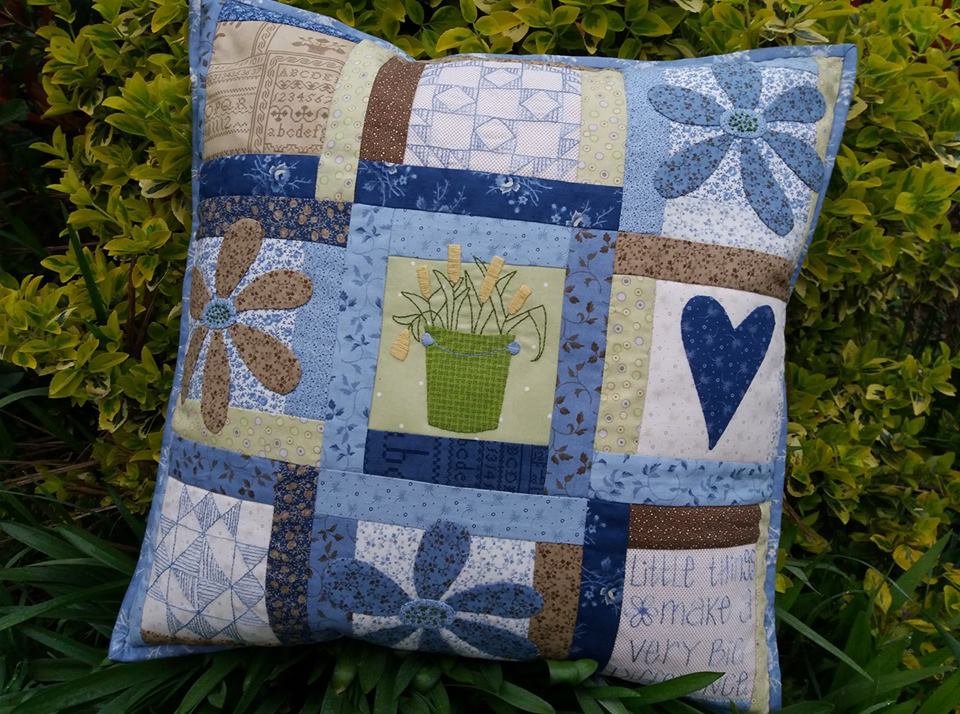
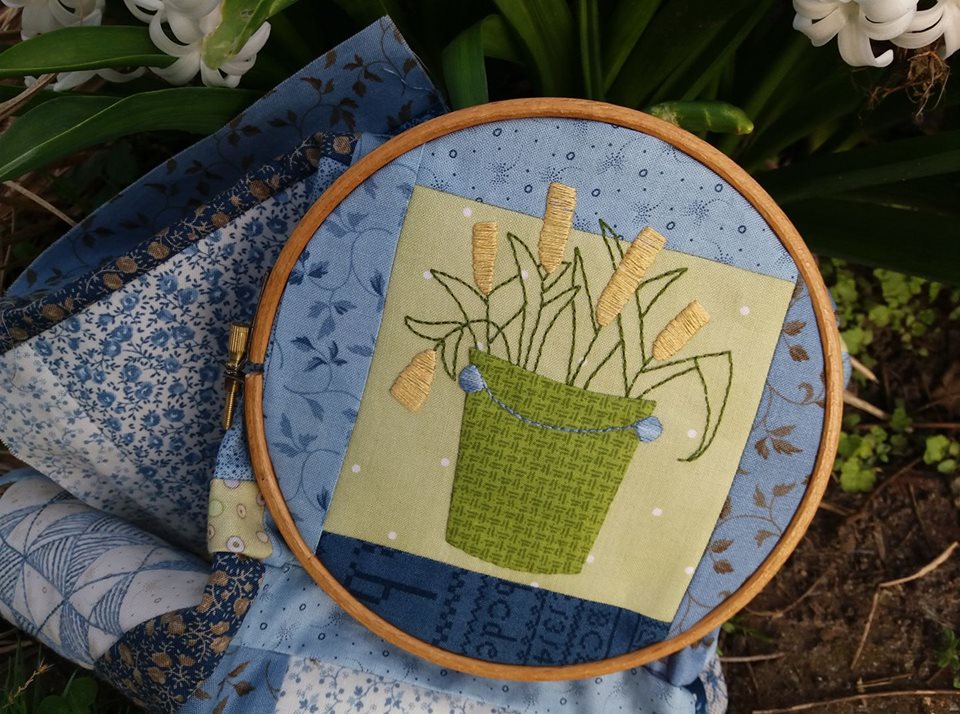
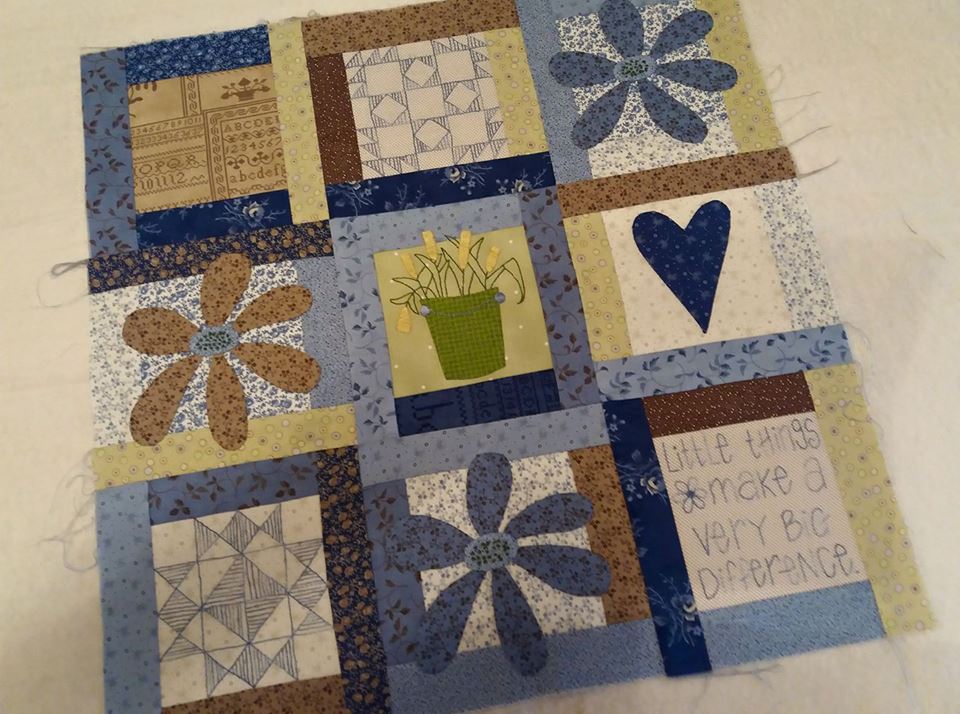
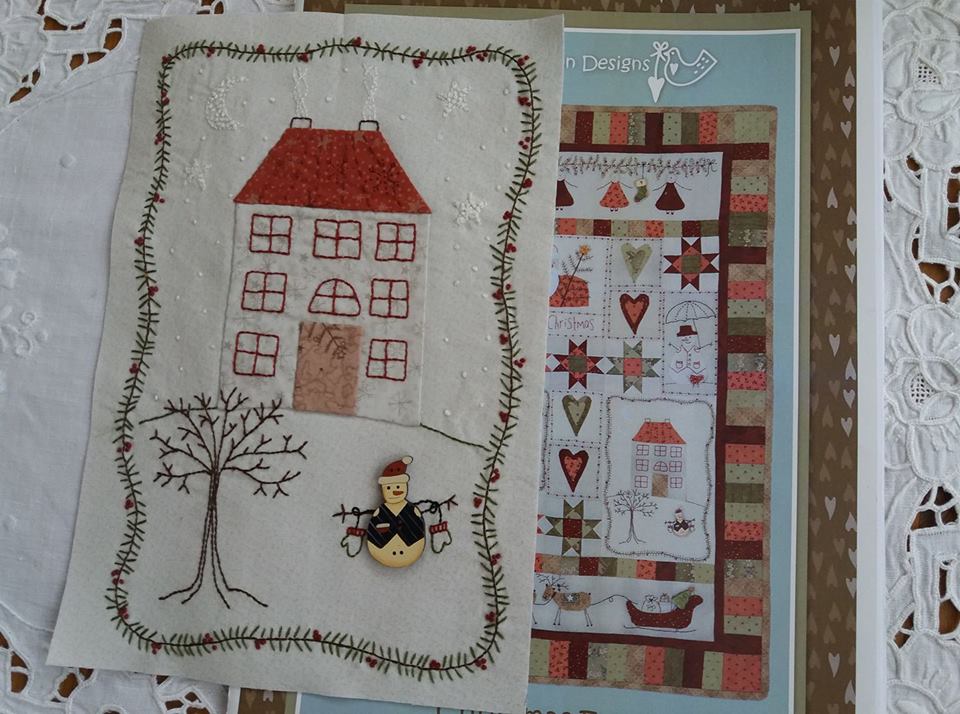
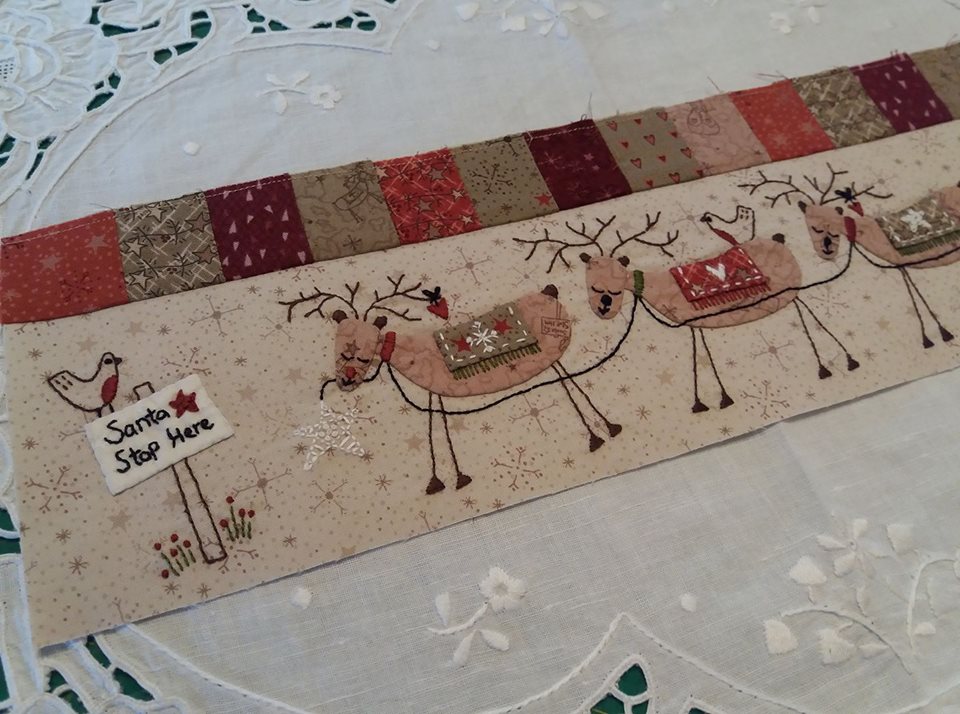
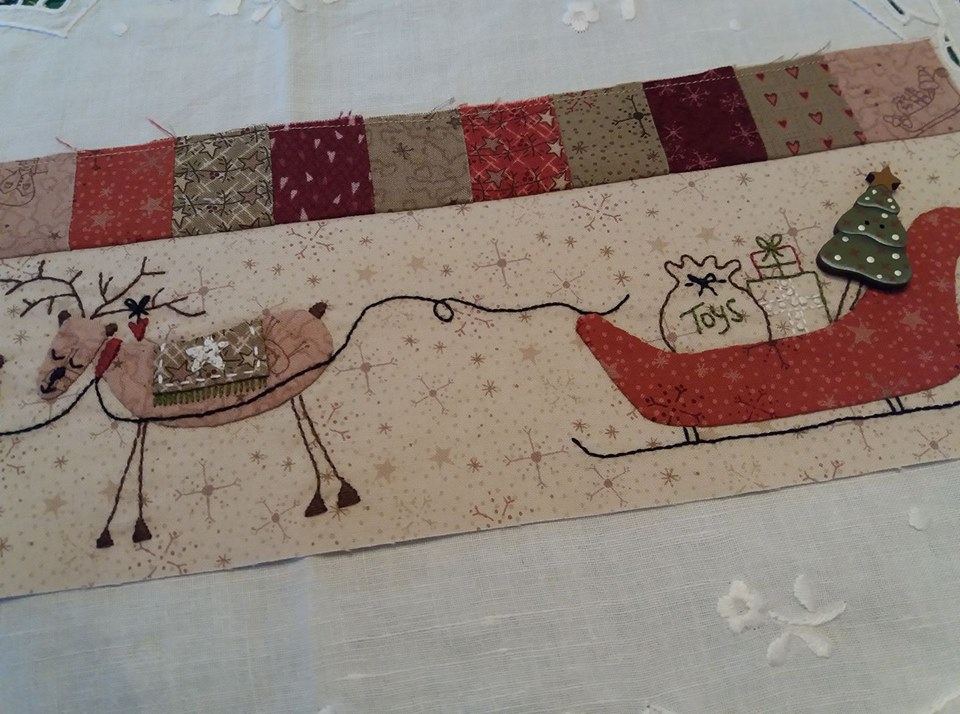
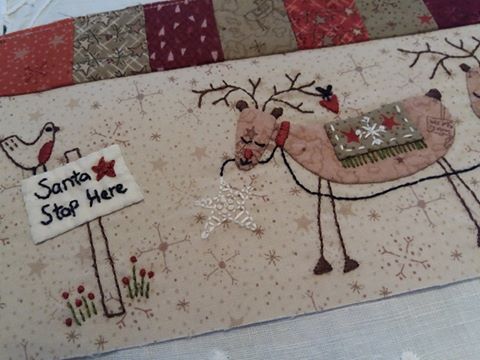
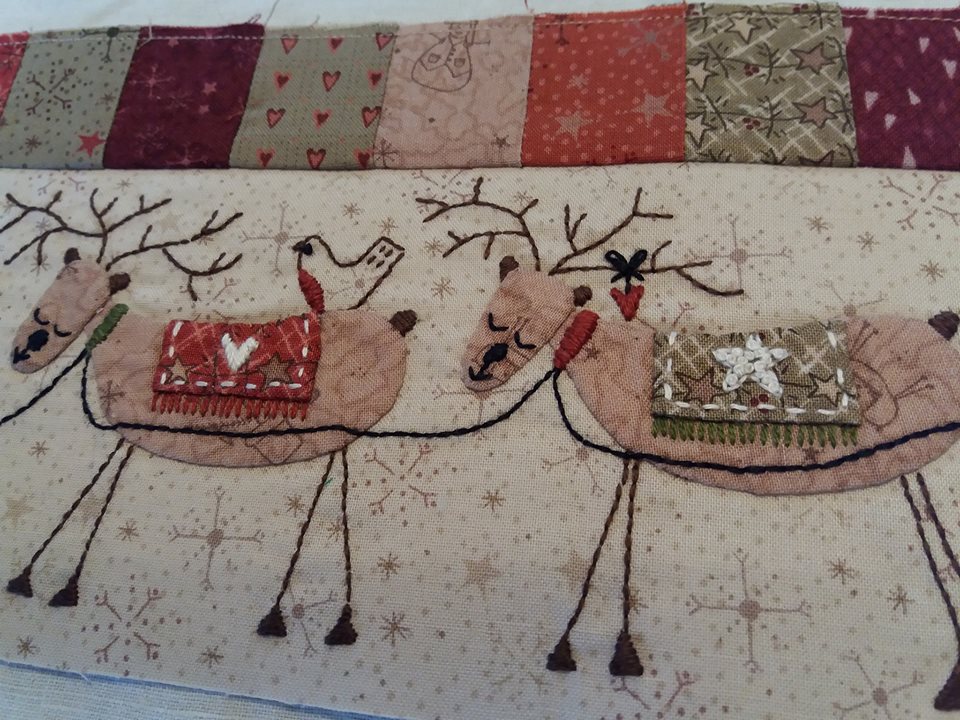
The blocks were pieced together a few days ago, and the borders were added. This has been a super project to make, and is made with a combination of techniques - machine piecing, hand embroidery and hand applique. This has been layered up on a piece of cotton wadding, and is all ready for machine quilting, as soon as I find the right backing fabric! These hand painted wooden buttons have just been laid on the quilt top for the photograph, they'll be stitched in place once the quilting has been completed. The pattern Christmas Fun is by the Australian designer Lynette Anderson Designs, and was bought with the set of wooden buttons, online just after Christmas from Patchwork Chicks, here in the UK.
The postman delivered a parcel on Monday from the Little Quilt Store in Australia. And what was inside? The latest kit by Lynette Anderson Designs, "My Scissor Keeper" which is a beautiful quilted case that's ideal for storing my Karen Kay Buckley Perfect Scissors. The outside of the case is embellished with hand embroidery and applique... ...the kit includes the pattern, all the fabrics needed for this project along with the stitchery stabiliser, a zipper, an acrylic hexagon template, and some pre-cut cardboard hexagon templates. I'll look forward to making this, and will be busy prepping the applique templates and tracing the stitchery design at the weekend.
Here's block 8 "Jolly Santa" - this pattern is Christmas Fun by Lynette Anderson Designs. The title of this block is so appropriate - he really does very jolly! The bobble on Santa's hat was made with a very tiny Suffolk Puff, appliqued into place. The cute star on the top of the tree is a hand painted wooded button and will be stitched into place when the quilt is finished. Now all 8 blocks can be machine pieced together and the borders added. It won't be too long and this festive quilt top will be completed. I'm deliberating over whether to quilt this one myself, especially as I've got my new Bernina 570QE to use!
Once the front of the cushion had been layered with some cotton wadding and backing fabric, it was machine quilted very simply with Aurifil 40wt thread. After being trimmed, I made a back for the cushion, with a zipper inserted. The front and back were then laid together and stitched all around the edges. A double fold binding was sewn on to cover the raw edges, just the same way as binding a quilt, including with mitred corners. One of my labels was added to the back, before the folded edge of the binding was hand stitched to the back of the cushion... ...and here's the completed cushion! This pattern is "The Waverley Bag" by the Australian designer Leanne Beasley, that was bought several years ago. I've never actually made a bag with this pattern, but I have made several cushions. The small patchwork blocks make this simple design look very effective, and had been hand embroidered and hand appliqued. All the fabrics were left over from a quilt I'd made last year, and they are from the Blueberry Crumb Cake collection by Blackbird Designs for Moda. This was made for a very dear colleague as a leaving gift, and she was really pleased with it.
I had lots of GORGEOUS fabrics leftover from a quilt that I made last year (fabrics are from the Blueberry Crumb Cake collection by Blackbird Designs for Moda) and they were just what I needed for my next project! I've used this pattern "The Waverley Bag" by the Australian designer Leanne Beasley for cushions rather than the bag, and it's always been one of my favourites. I used a beautiful shade of Cottage Garden Thread 418 Blue Heaven - this skein was leftover from the Flowerville quilt that I'd finished earlier this year... ...there are a couple of "patchwork" designs that look great stitched in this soft variegated blue thread. I used DMC threads for the tulips block... ...a few appliqued daisies scattered on the blocks and the main part of the cushion was completed! This will be machine quilted VERY simply as I am running out of time to get this project completed! Thank goodness I'll have a couple of hours sewing at a local quilt group on Monday evening as I need to get it finished ready for delivery on Tuesday!
The next block didn't have any piecing, just lots of lovely embroidery and applique and of course another cute hand painted wooden button! This is Block 7 "Christmas Cottage" - and the pattern is Christmas Fun by Lynette Anderson Designs. There are several quilt shops here in the UK that sell Lynette's patterns and fabrics - my favourites are Patchwork Chicks (this is where I'd bought this pattern, just before Christmas), Cross Patch (Julia has a great assortment of patterns and she has some kits for this one too, although I'm making this with my own "Lynette festive fabrics!), Cowslip Workshops, and Coast & Country Crafts & Quilts. The embroidery was completed with DMC threads, using very simple stitches - back stitch, satin stitch, cross stitch and colonial knots. This cute snowman looks very jolly, and the button will be stitched into place once the quilt is completed.
Block 6 "Stop Here" was a bit tricky to photograph, as it's 18.5" long, and it was easier to take pictures of it in stages! This is part of the Christmas Fun quilt, pattern by Lynette Anderson Designs. These gorgeous fabrics are also by Lynette, and had been in my fabric box for too long - and this was the perfect project for using some of them. This block was great fun to make, and used a mixture of hand embroidery, applique and machine piecing - those squares were just 1.5" in size before they were machine pieced together. This is really coming along nicely, and block 7 is almost finished.
Block 6 "Stop Here" was great fun to make - this trio of reindeer are just so cute! This pattern is Christmas Fun by Lynette Anderson Designs, and was bought online just after Christmas from Patchwork Chicks here in the UK. This has been made using a selection of festive fabrics from my box of "Lynette" fabrics. Lots of 1.5" squares were pieced together to make the pretty top of this block. I used my favourite Auroifil 50wt thread for the machine piecing, along with a Superior Titanium size 60 needle... ...the embroidery was all stitched by hand, using 2 strands of DMC threads, and the applique completed using my favourite method - applique paper and a glue pen and apliquick rods. There are several turorials on YouTube demonstrating this method of applique. The cute hand painted wooden Christmas tree button shown in the picture above will be hand stitched into place once the quilt has been completed. Only 2 more blocks before these can be pieced together and I can start making the borders!
*Julia at Cross Patch in Wales also has this pattern in stock and has some kits for this too. Well here it is in all it's glory - this wonderful sewing machine, the Bernina 570QE, arrived on Wednesday from Tysew Limited, and I finally got a chance to play with all the goodies today. The knee lift is taking a bit of getting used to -and I haven't quite perfected the technique - I look more like a dog cocking it's leg when I'm using it! The accessory case reminds me of the Sindy dolls wardrobe I had when I was a little girl - it's the perfect storage unit for keeping everything neat and tidy, with racks for bobbins and feet, slots for packets of machine needles and pull out drawers. The BSR is something that I shall enjoy practising my FMQing skills with! The colour touch screen is amazing - very high tech! Anyway I've had a wonderful day playing with this, and will be even more proficient once I've been on the training day at Bernina in London!
|
About me...Hi - welcome to my quilting blog! My passions are my family, my dog, my friends and sewing, not necessarily in that order! Archives
July 2023
Blogs I followUK shopsThese are the UK shops that I use to purchase my quilting supplies - fabrics and threads etc.
Australian linksScandinavian links |